.svg)
For Businesses
These articles are related to frequently asked questions by employees.


Payroll Manager
See All Articles
 5 mins
Payroll Manager Overview
What Is the Payroll Manager?
Payroll Manager is a read-only payroll visibility tool that connects payroll cycles, employee results, and invoice totals.
The Payroll Manager provides a clear, consolidated view of payroll outcomes by showing payroll cycles, employee payroll results, and how those results relate directly to invoices. It enables review and analysis without allowing any changes to payroll data.
What the Payroll Manager Is Designed to Do
Payroll Manager is designed to help users:
- Understand what payroll was processed across completed pay cycles
- Identify what changed between pay cycles, including adjustments that affect totals
- See how payroll impacts invoice totals and overall billing amounts
All of this is available without requiring payroll expertise or manual reconciliation across multiple reports.
What it is not
- It does not process payroll
- It does not allow edits to employee pay, tax rules, or payroll calculations
- It does not show final payroll actuals
(Values shown are estimated payroll amounts used for invoicing.)
Final payroll actuals are confirmed directly through the payroll provider.
See it in action below:
5 mins
Understanding the Payroll Manager Views
The Payroll Manager includes two views, Upcoming Payroll and Payroll & Invoicing History, to plan future payroll and review completed payroll cycles.
The Payroll Manager provides two distinct views to manage payroll at different stages of the payroll lifecycle: Upcoming Payroll and Payroll & Invoicing History. Each view supports a specific workflow, depending on whether you are forecasting future payroll or reviewing finalized results.
1) Upcoming Payroll
What Is the Upcoming Payroll View?
Upcoming Payroll simulates future payroll cycles, including the next upcoming cycle and future months. It provides a forward-looking estimate of payroll totals and the next expected invoice.
What It’s Used For
Use Upcoming Payroll to:
- Plan and forecast upcoming payroll costs
- Review the next expected invoice total
- Identify missing, incomplete, or future-dated payroll inputs before cut-off
- Understand how future employee changes (starters or terminations) affect payroll
What Does the Default View Contain?
The default view automatically loads the next pay cycle. It directly correlates to the next invoice you will receive (invoice amendments are typically excluded).
Key Features of the Upcoming Payroll View
- Payroll cut-off countdown to track submission deadlines
- Month selector for future payroll simulations
- Filters and search to refine payroll data
- Display currency toggle for multi-currency visibility
- Add Cost Item for salary additions such as bonuses, commissions, or back pay
- Employee payroll details with line-by-line visibility
- Table exports for offline review and reporting
2) Payroll & Invoicing History
What Is the Payroll & Invoicing History View?
Payroll & Invoicing History provides access to completed payroll cycles and final invoice results. This view serves as the system of record for payrolls that have already been processed and billed.
What It’s Used For
Use Payroll & Invoicing History to:
- Perform historical reviews of payroll and invoices
- Reconcile invoice totals against payroll outcomes
- Support audits, reporting, and finance checks
- Review invoice changes and adjustments
What Does the Default View Contain?
The default view loads the most recently processed pay cycle.
Key Features
- Explore and review past pay cycles
- Month selection to review a single historical cycle
- Range selection options:
- View All to display all employee results across the range
- Aggregate to roll up totals per employee across multiple cycles
Key Differences From Upcoming Payroll
✅ Review completed payroll and finalized invoices
✅ View invoice amendments per employee with detailed breakdowns
❌ Read-only view; salary additions cannot be added or edited
Quick Guide: Choosing the Right View
Use Upcoming Payroll to:
- Forecast the next invoice
- Confirm requirements before payroll cut-off
- Understand how future changes affect payroll
Use Payroll & Invoicing History to:
- Verify completed payroll cycles
- Reconcile invoice totals
- Review invoice amendments and historical outcomes
5 mins
How to Access the Payroll Manager
You can access the Payroll Manager in two ways: from the left-hand navigation menu or directly via URL.
Access the Payroll Manager from the left-hand navigation menu under “Payroll”. This is the primary method for navigating to payroll tools within the platform.
✅ Option 1 – Access Payroll Manager from the Navigation Menu
From the left-hand menu, select Payroll, then click Payroll Manager to open the payroll management dashboard.
✅ Option 2 – Access Payroll Manager Directly via URL
You can also open the Payroll Manager directly by navigating to:
https://app.playroll.com/payroll-manager
Platform Usage
See All Articles
5 mins
Can I Edit the Roles of Existing Users?
You are able to edit the roles of existing users on the Playroll platform. Follow the simple
steps outlined below:
Steps to Edit User Roles
Follow these steps to edit the roles of existing users in the Playroll platform:
- Log in to the Playroll platform.
- Select 'Settings' at the bottom of the Navigation Panel on the left-hand side of the screen.
3. Select the 'Users' tab and locate the user whose permissions you want edit. Once located, select the the pencil icon.
4. A dropdown menu will appear, allowing you to amend the specific permissions for the relevant user.
5. After updating the permissions, click 'Save' to apply the changes.
5 mins
How to View Playroll's EOR Pricing by Territory
You can view Playroll's Employer of Record (EOR) pricing per territory directly on the platform.
Playroll's monthly EOR fees vary by territory. You can view current pricing for every country we offer services in from the Playroll Fee List.
✅ Step 1 – Open the Tools dropdown
Select the "Tools" dropdown on the main panel on the left-hand side of the screen.
✅ Step 2 – Select Playroll Fee List
Select "Playroll Fee List". This displays the list of countries we offer services in and their respective fees.
✅ Step 3 – Review pricing by territory
On the Playroll Fee page, you'll see pricing grouped by territory category. Each category shows a monthly fee per employee, along with the countries included in that group.
Understanding the Fee List page
- Fees are shown in your company's billing currency.
- Hover over the information icon next to a country to see if a discounted rate applies to your company.
- A globe icon indicates territories where Playroll offers visa sponsorship, with the associated visa fee shown in a tooltip.
- Some territories are marked "Price on Request" (POR) and require a custom quote.
If you want to calculate the full cost of hiring in a specific territory, including employer contributions, use the Cost Calculator under the same Tools dropdown.
Should the pricing for the territory you're interested in hiring in not be available, please reach out to support@playroll.com or your dedicated point of contact for assistance.
5 mins
How to Change the Primary Authorised Signatory in Playroll
Update the primary authorised signatory in Playroll in 2 steps via Settings > Company and save the new details.
You can change the primary authorised signatory directly within your company settings. Follow the steps below to replace the current signatory with a new authorised representative.
Update the Authorised Signatory
✅ Step 1 – Open Company Settings
Navigate to Settings and select the Company tab. Locate the current Authorised Signatory and click the Pencil icon next to their name to begin editing.

✅ Step 2 – Enter the New Signatory Details
Replace the existing signatory’s details with the new authorised signatory’s information. Once all required fields are updated, click Submit to save your changes.

The updated signatory will immediately be reflected in your company records.
Integrations
See All Articles
5 mins
How to Integrate Bamboo HR and Playroll
You can integrate Bamboo HR with Playroll by following the steps outlined below.
Step 1:
Select the 'Tools' option from the drop-down navigation panel in Playroll.
Step 2:
Select the ‘integrations’ category as shown below:
Step 3:
Once you are on the integrations page, you will see the available platforms that can be integrated with Playroll. Please select the platform you would like to have integrated with Playroll.
Step 4:
After selecting Bamboo HR, navigate to the 'Configuration' tab at the top of the page.
Step 5:
The Configuration page will provide you with a step-by-step guide on how to connect Bamboo HR with Playroll.
Step 6:
Once the integration has been successful, you will see a green tick to the right of the platform, as can be seen below:
5 mins
How To Integrate HiBob With Playroll
What the HiBob + Playroll Integration Does
HiBob integrates natively with Playroll, automatically syncing employee records, time-off requests, and payslips between the two platforms. Your HR team manages people in Bob, while Playroll handles global employment, compliance, and payroll behind the scenes. Together, the integration eliminates duplicate data entry, keeps leave records accurate across both systems, and ensures employees always have access to their payslips in one place.
Requirements Before You Start
Before you get started, confirm the following:
- You have a valid HiBob account with permission to create a Service User
- You are logged into Playroll with permission to manage Integrations
- You have access to HiBob System Settings (Admin-level access)
- Each employee has the same email address in both HiBob and Playroll – the email used to log in to Playroll must match either the work email in "Basic Info" or the "Personal Email" field in their HiBob profile
💡 Important: If you don't have the right access level in HiBob to create a Service User, contact your HiBob administrator before proceeding.
How to Connect HiBob To Playroll
The setup happens in two parts: first, you create and configure a Service User in HiBob, then you connect it to Playroll and configure your sync settings.
Part 1: Set Up a Service User in HiBob
A HiBob Service User is a dedicated API credential that allows Playroll to securely read and write data to your HiBob account.
Step 1: Create a Service User in HiBob
Follow HiBob's official guide on creating a Service User and retrieving your credentials: 👉 HiBob API Service Users Guide
Once created, take note of your Service User ID and Token (you'll need these in Part 2).
Step 2: Set the Correct Permissions – Features Tab
In HiBob, navigate to System Settings → Permission Groups and open the permission group assigned to your Service User.
Under the Features tab, ensure the following are enabled:
People
- Directory, Employees, Lists, About, Address, Basic info, Email, Employment, Equity, Financial, Home, Identification, Jobs, Lifecycle, Payroll, Personal, Personal contact details, Work, Work contact details
Docs
- Confidential Docs, Shared Docs
Time off
- Settings, Balance, Requests, See who's out today
Step 3: Set the Correct Permissions – People's Data Tab
Still in the same Permission Group, click the People's Data tab.
Under Access data for, ensure the Service User has access to Everyone (or the relevant employee subset if you are limiting scope).
💡 Tip: If you only want Playroll to sync a subset of employees, select "Select people by condition" or "Select people by name" instead of Everyone, and define the relevant filter.
Under the Time off section of People's Data, confirm all of the following sub-permissions are checked:
- Balance: Adjust balances, Bank overtime, See balances
Requests: Create, edit, cancel, approve, and view all time-off request fields
Part 2: Connect HiBob to Playroll
Step 4: Navigate to Integrations in Playroll
Log in to app.playroll.com. From your dashboard, click Tools in the left sidebar, then click Integrations.
Step 5: Select HiBob
On the Integrations page, locate and click the HiBob tile.
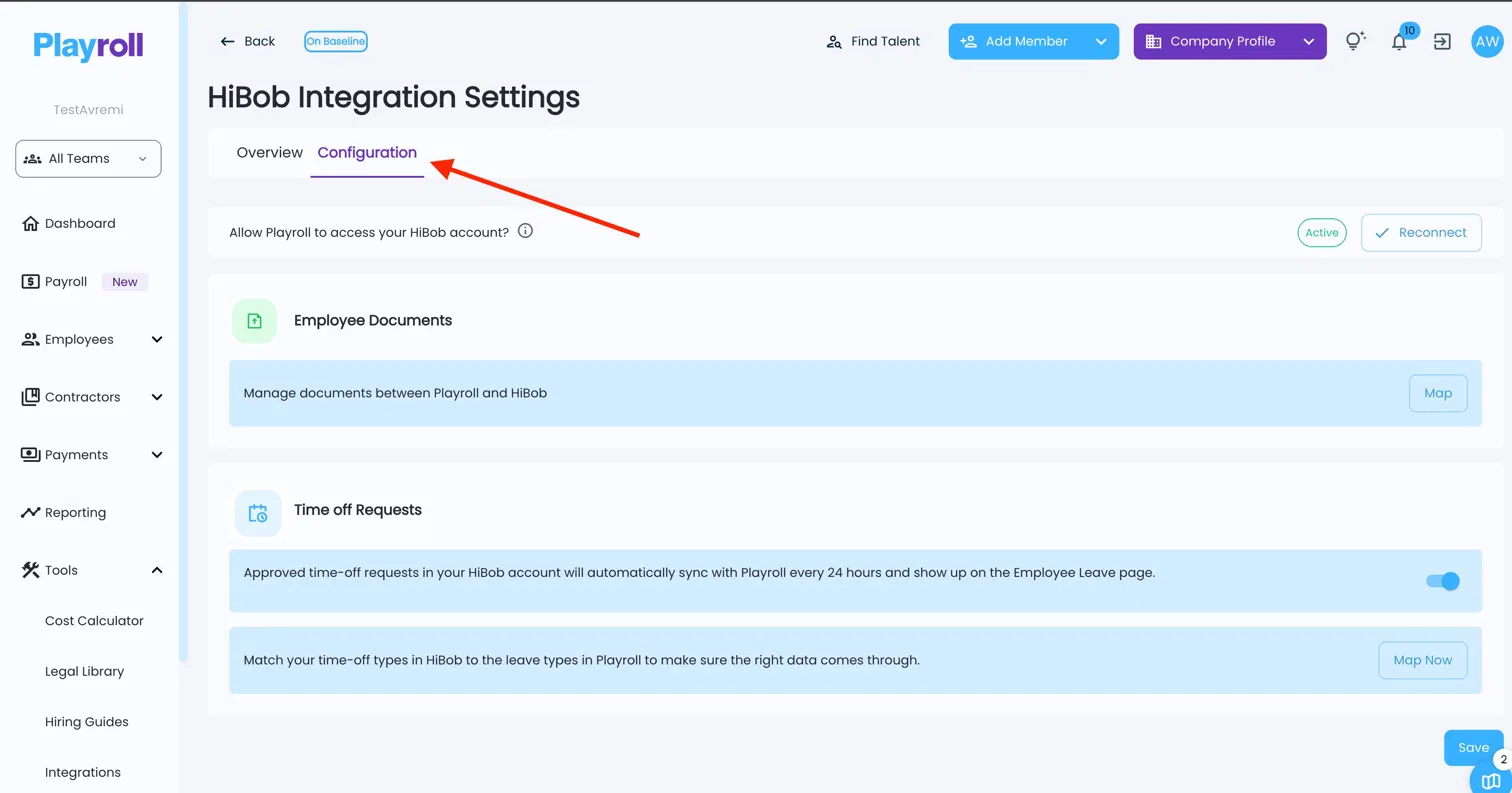
Step 6: Open the Configuration Tab and Click Connect
On the HiBob Integration Settings page, click the Configuration tab. You'll see the status showing Pending Authentication with a Connect button in the top-right corner. Click Connect.
Step 7: Enter Your HiBob Service User ID and Token
A modal will appear prompting you to enter your HiBob Service User ID and Service User Token. Copy and paste these from HiBob, then submit.
Part 3: Configure Sync Settings
Step 8: Enable Time-Off Sync
Once connected, under Time off Requests on the Configuration tab, toggle on the time-off sync.
💡Good to know: Approved time-off requests in HiBob will automatically sync with Playroll every 24 hours and appear on the Employee Leave page.
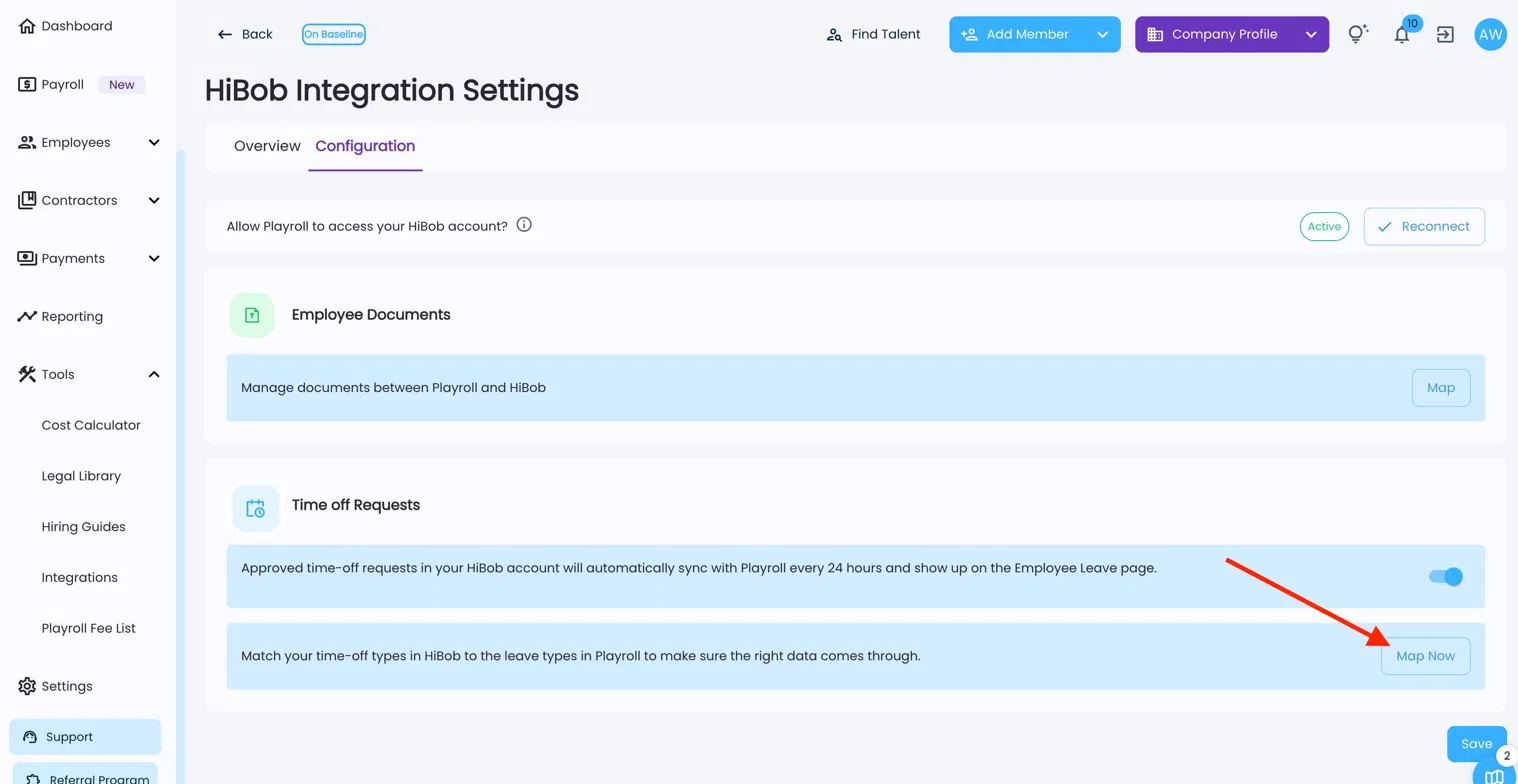
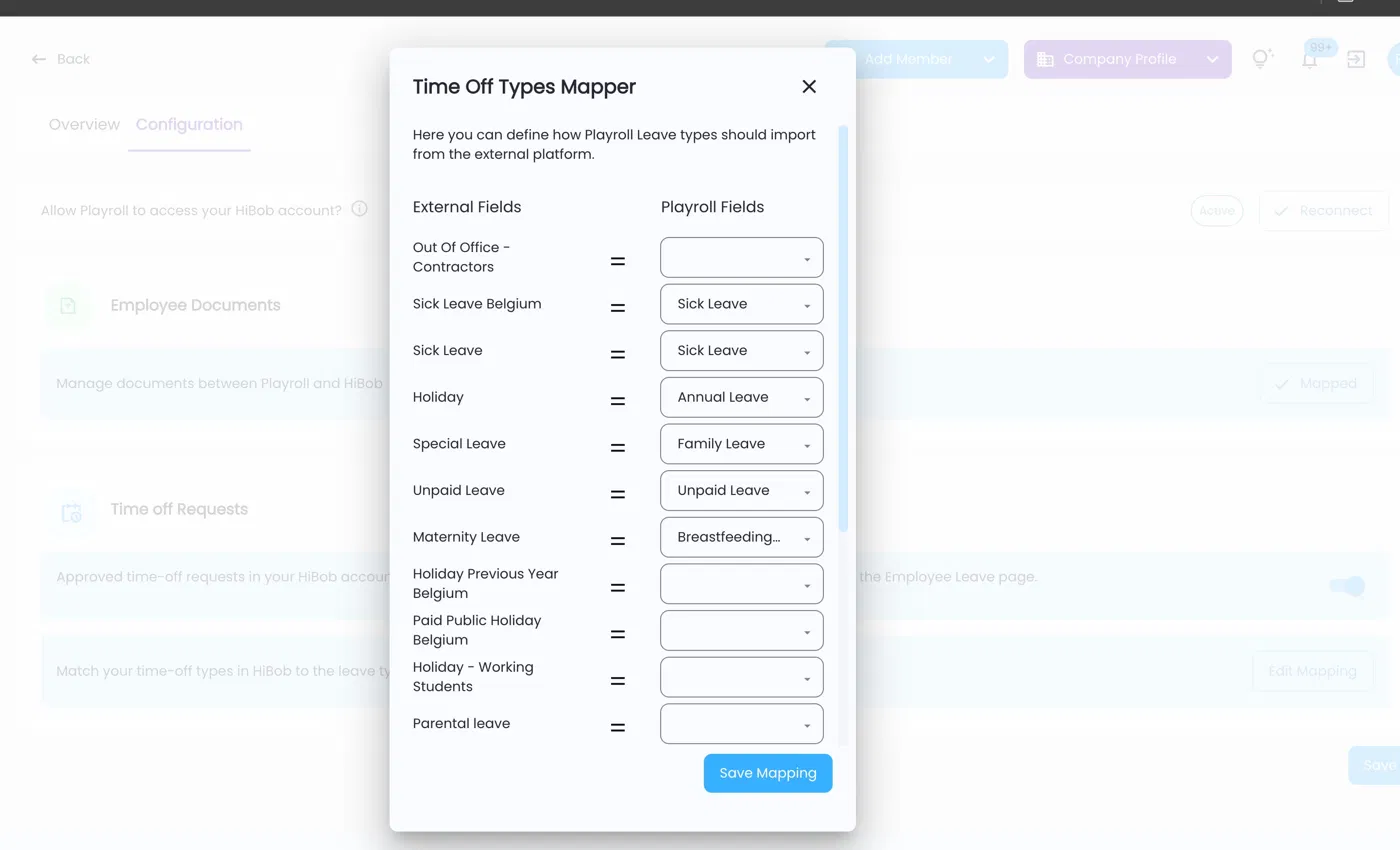
Step 9: Map HiBob Time-Off Types to Playroll Leave Types
Click Map Now next to the time-off mapping row. In the Time Off Types Mapper, match each HiBob leave type on the left to the corresponding Playroll leave type on the right. Click Save Mapping when done.
💡Note: Leave types that are not mapped will not sync. If you add new leave types in HiBob later, return here to update the mapping.
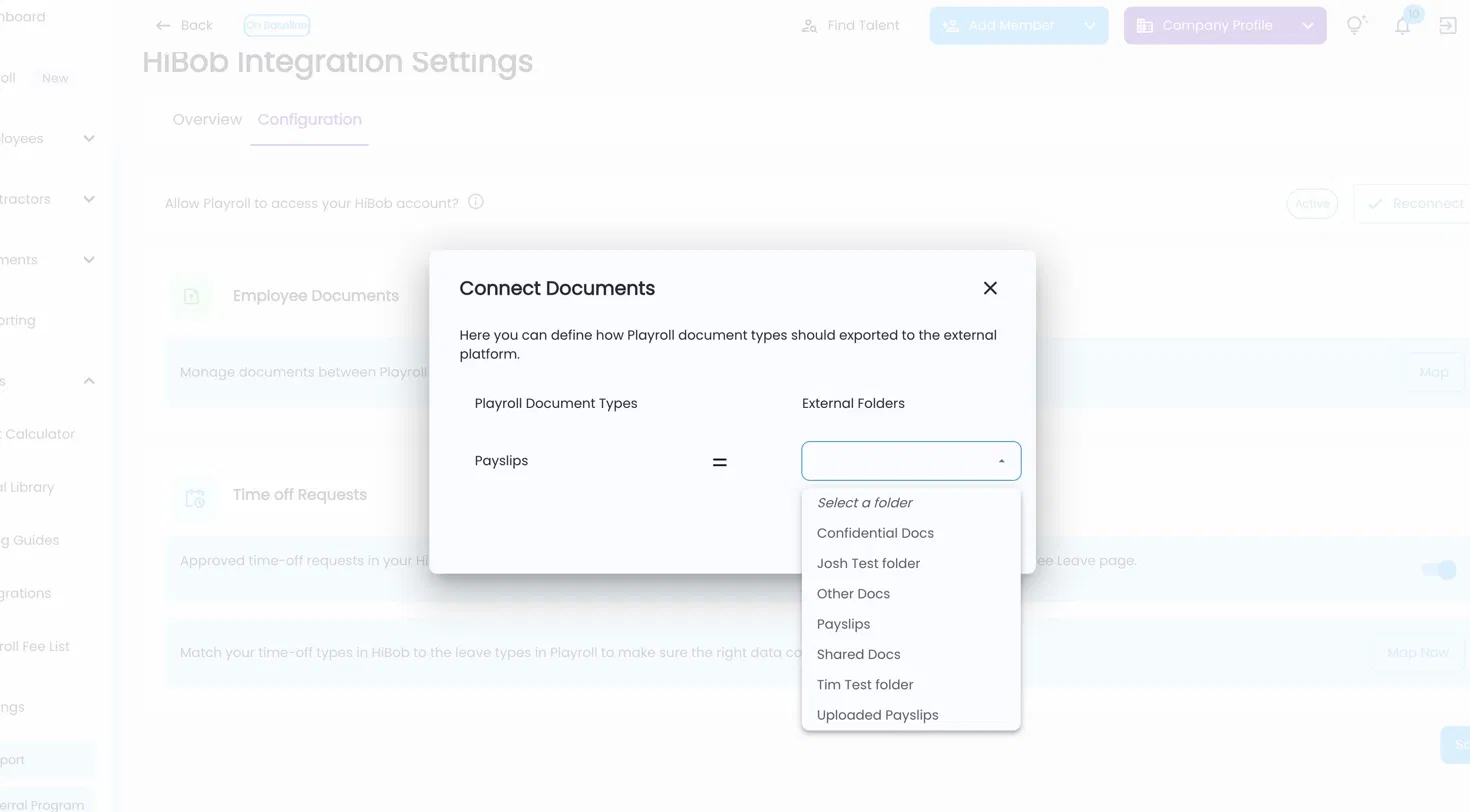
Step 10: Map Payslip Documents to a HiBob Folder
Under Employee Documents, click Map. In the Connect Documents modal, select which HiBob folder your Playroll payslips should sync to (e.g. "Payslips", "Confidential Docs", or a custom folder). Click Save when done.
Click the blue Save button on the Configuration page to confirm all settings.
Part 4: Import Your First Employee
Step 11: Add an Employee via the HiBob Import
From your Playroll dashboard, click Add Member → Add Employee in the top navigation bar.
On the Employee info screen, click the Import from HiBob button at the top of the form.
In the HiBob Employee Import modal, select the employee you want to import from the dropdown, then click Begin Import. Their details will populate automatically.
Setup Checklist
Before considering the integration complete, confirm all of the following:
✅ HiBob Service User created with all required Features and People's Data permissions
✅ Service User ID and Token entered in Playroll and status shows Active
✅ Time-off sync is toggled on
✅ All relevant HiBob leave types are mapped to Playroll leave types
✅ Payslips are mapped to the correct HiBob document folder
✅ Employee email addresses match between HiBob and Playroll
HiBob + Playroll FAQs
Why isn't the "Import from HiBob" button appearing when I add an employee?
The import button only appears once your HiBob Service User credentials have been successfully entered and the integration status shows Active on the Configuration tab. If you've just connected, try refreshing the page. If the status still shows Pending Authentication, double-check that the Service User ID and Token were entered correctly.
How long does it take for leave requests to appear in Playroll after I turn on the sync? Approved time-off requests sync from HiBob to Playroll every 24 hours. If a request was approved in HiBob today, it may take up to 24 hours to appear on the Employee Leave page in Playroll. Requests must be approved in HiBob first, as pending requests will not sync.
What happens if an employee's email doesn't match between HiBob and Playroll?
The sync relies on a matching email address to identify employees across both platforms. If the email used to log in to Playroll doesn't match either the work email or personal email in HiBob, the employee's records won't sync correctly. Ensure email addresses are updated in both systems before running an import or enabling leave sync.
Can I control which employees Playroll has access to in HiBob?
Yes. In HiBob's Permission Group settings for your Service User, you can limit access under the People's Data → Access data for section by selecting "Select people by condition" or "Select people by name" rather than Everyone. This is optional and useful if you only want Playroll to manage a subset of your workforce.
5 mins
How To Integrate Expensify With Playroll
What the Expensify + Playroll Integration Does
Connecting Expensify to Playroll means approved employee expenses flow directly into Playroll for processing – without manual exports, copy-pasting, or reconciliation needed.
Once set up, any expense your team submits and gets approved in Expensify will automatically sync into Playroll, ready to be included in payroll runs.
A few things worth knowing upfront:
- This is a one-way integration: expenses move from Expensify to Playroll only
- Changes made in either system after syncing won't update the other
- Only approved expenses sync – drafts and pending reports won't appear in Playroll
Requirements Before You Start
Before you touch any settings, confirm the following:
- You have Workspace Admin or Owner access in Expensify
- You're logged into the Expensify account that owns or administers the workspace
- You have access to Playroll with permission to manage integrations
- You can access Expensify Classic (some required settings live there only)
Important: If you don't have Admin or Owner-level access in Expensify, you won't be able to complete the connection. Check your role under Workspaces → Members before you start.
How To Connect Expensify To Playroll
The setup happens in two parts: first, you configure a few things in Expensify, then you connect to Playroll and map your expense categories.
📹 Prefer a walkthrough? Watch this short Loom video for a full run-through of the setup before you start: Watch the Expensify + Playroll Setup Video
Part 1: Required Configuration in Expensify
These steps need to be completed in Expensify before you go to Playroll. Skipping them is the most common reason the integration doesn't work.
Step 1: Switch to Expensify Classic
Some of the settings you need are only available in the older Expensify interface.
- Log in to Expensify (new interface)
- Click your account logo in the top corner
- Select Troubleshoot
- Click Switch to Expensify Classic
Step 2: Enable Public Receipt Visibility
Playroll needs to be able to read receipts to process expenses. If this setting isn't turned on, expenses won't sync – even if everything else is configured correctly.
- In Expensify Classic, go to Settings → Workspaces
- Select the workspace you want to sync with Playroll
- Navigate to Rules
- Enable Public Receipt Visibility
Watch out for this: Public Receipt Visibility is off by default on most workspaces. It's easy to miss - and if it's not enabled, no expenses will appear in Playroll, regardless of other settings.
Step 3: Set "Receipt Required Amount" to Zero
This ensures every expense requires a receipt before it can sync.
- In the same Rules section, find Receipt Required Amount
- Set the value to 0
- Save your changes
Why does this matter? If the required amount is set to, say, 100, any expense below that threshold won't need a receipt and won't sync to Playroll.
Step 4: Confirm Your Workspace Permissions
Double-check that the person setting up the integration is either a Workspace Admin or the Workspace Owner. You can verify this under Workspaces → Members.
If you don't have the right access level, contact whoever manages your Expensify account before continuing.
Setup Checklist
Before considering the integration complete, confirm all of the following:
- Public Receipt Visibility is enabled in Expensify
- Receipt Required Amount is set to 0
- Your Expensify workspace permissions are confirmed (Admin or Owner)
- Expensify is successfully connected to Playroll (status shows Active)
- Expense categories are mapped and saved
- Employee emails match between Expensify and Playroll
Part 2: Connecting Expensify to Playroll
Once Expensify is configured, move to Playroll to complete the connection.
Step 5: Navigate to the Expensify Integration
- Log in to Playroll
- Go to your Dashboard
- Click Tools → Integrations
- Select Expensify
- Open the Configuration tab
Step 6: Connect Your Expensify Account
- Click Connect (top-right of the page)
- You'll be prompted to enter two credentials:
- Partner User ID
- Partner User Secret
To find these, click "Find our Partner ID" in the Playroll pop-up while logged in to Expensify. Copy both values and paste them into Playroll, then click Submit.
Once the connection is successful, the integration status will update to Active.
Part 3: Mapping Expense Categories
The final step is making sure Expensify's expense categories match up with Playroll's. Without this mapping, expenses may not be categorized correctly when they arrive in Playroll.
Step 7: Map Expensify Categories to Playroll Categories
- On the Expensify integration page, go to Expense Categories
- Click Map Categories
- You'll see Expensify categories on the left, Playroll categories on the right
- For each Expensify category, select the corresponding Playroll category:
- Expensify "Car" → Playroll "Car Rental"
- Expensify "Equipment" → Playroll "Equipment."
- Click Save
Practical Tip: Make sure your employees' email addresses in Expensify match their Personal Emails in Playroll. If they don't match, expenses won't be attributed to the correct employee.
Optional Integration Settings
Depending on your team's setup, you may also want to configure:
- Field mapping – customise how expense fields translate between systems
- Time-based sync – control when approved expenses are pulled into Playroll
- Feature-specific toggles – available for some workspace types
If your integration doesn't have advanced config options, you can skip this section.
Orbit HR GPT
See All Articles
5 mins
How To Use Orbit, Playroll’s Global AI Assistant
Orbit is Playroll’s global AI assistant, built to help you go beyond surface-level information when navigating global employment. Unlike generic AI tools, Orbit is powered by the verified, up-to-date knowledge of Playroll’s in-house HR, payroll, and legal experts, and designed to support business-critical global hiring decisions.
How to Get Started
- Go to https://ai.playroll.com/
- Enter your details and how you’re planning to use Orbit
- Complete sign-up
- You’re in and can start using Orbit for free
Once logged in, you can begin asking questions immediately.
What to Use Orbit For
Global Hiring Feasibility
- Where you can hire employees or contractors
- What employment setup is required in each country
Whether you need a local entity or alternative setup
Employment Law & Compliance
- Mandatory benefits, leave, and notice periods
- Termination rules and severance requirements
- Working hours, probation periods, and statutory protections
Classification Risk
- Employee vs contractor classification guidance
- Country-specific risk factors
- What misclassification could mean for your business
Tips for Writing Effective Queries
The quality of Orbit’s answers improves with the quality of your questions. Here’s how to get the most out of it:
Be Specific
Instead of:
“Can I hire in Germany?”
Try:
“Can I hire a full-time software engineer in Germany, and what are the key employment requirements?”
Adding role type, seniority, or employment model helps Orbit give more relevant answers.
Ask Follow-Up Questions
Orbit is conversational. If an answer feels high-level:
- Ask Orbit to expand
- Request examples
- Ask how rules apply to your specific scenario
For example:
“Can you break this down by mandatory vs optional benefits?”
Test Real Scenarios
Orbit works best when you use real situations you’re facing:
- Countries you’re actively hiring in
- Roles you’re planning to fill
- Employment models you’re considering
Clarify Assumptions
If you’re unsure whether an answer applies to your situation, ask:
“Does this apply to startups?”
“Is this different for contractors?”
“What are the common mistakes companies make here?”
If you’re stuck, reach out to your CSM or book a first consult with our experts here.
Communications
See All Articles
5 mins
How To Subscribe to Playroll Marketing Emails
You can subscribe to Playroll newsletters and marketing emails directly through our website. To do so, visit the homepage, scroll to the bottom of the page, and enter the email address you’d like to use to receive Playroll communications, as shown below.
If you experience any issues during this process or have any further queries, please don't hesitate to reach out to support@playroll.com.
Invoicing
See All Articles
5 mins
Playroll Exchange Rate Methodology and FX Fees Explained
Learn how Playroll sets exchange rates and applies an FX fee to manage currency fluctuations and payroll risk.
Playroll uses aggregated market exchange rates and applies a foreign exchange (FX) fee when billing and payment currencies differ. This article explains how rates are set, why they may differ from public spot rates, and why the FX fee is necessary for accurate, on-time international payroll.
Exchange Rate Methodology
Playroll does not rely on a single bank or official source for foreign exchange rates. Instead, we use an API that aggregates data from multiple reputable financial providers. This approach captures a rate that reflects broader market conditions rather than the pricing of one specific institution or platform.
The exchange rate is captured early in the morning on the day of invoicing. That rate is then applied consistently to all invoices generated on the same day, ensuring standardization and fairness across clients.
Because the rate is based on aggregated market data, it may differ slightly from the rate displayed on individual banking apps, currency converters, or public spot rate platforms. Publicly displayed rates often do not include operational or transaction-related costs.
This methodology is designed to provide a fair and representative market rate while maintaining consistency in invoicing.
Foreign Exchange (FX) Fee
Playroll charges a foreign exchange (FX) fee when the your billing currency differs from the currency used to pay employees. This fee covers the operational costs of currency conversion and helps manage the financial risks associated with foreign exchange volatility.
Why a Forex Fee Is Necessary
Exchange rates can fluctuate between the time payroll is calculated and the date employees are paid. Employees are paid based on the exchange rate applicable on the actual payment date and not the earlier rate from when payroll was initially calculated.
The FX fee helps buffer against exchange rate fluctuations between:
- The date the invoice is issued, and
- The date payment is processed and converted for payroll.
This structure ensures employees are paid accurately and on time, even if currency markets move between invoicing and payroll disbursement.
The fee is applied to the aggregated market rate. As a result, the final rate shown on your invoice may differ from publicly displayed spot rates, which typically exclude transaction, service, and risk management costs.
5 mins
Can Playroll Change the Entity It Bills Us from to Avoid Being Charged VAT?
5 mins
How to View the Exchange Rate Applied to Your Invoice
You can view the exchange or conversion rate applied to your invoice by downloading the detailed invoice report from the Payroll Hub.
If your employees are paid in a currency that's different from your billing currency, Playroll applies an exchange rate to convert those amounts on your invoice. You can see the exact rate used for any payroll month by downloading that month's detailed invoice report.
✅ Step 1 – Log in to the Playroll platform
Log in to the Playroll platform using https://app.playroll.com/.
✅ Step 2 – Open the Payroll Hub
Click the "Payroll Hub" tab on the left-hand side of the screen.

✅ Step 3 – Open the Billing tab
Click the "Billing" tab on the left-hand side of the screen.

✅ Step 4 – Download the detailed invoice report
Select the three dots on the right-hand side of the screen for the applicable payroll month, then click the download icon to export the detailed invoice report as an Excel file.

✅ Step 5 – Find the rate in the Billing Currency tab
Open the downloaded Excel file and go to the "Billing Currency" tab. Depending on your invoice layout, you'll see either:
- A "Conversion Rate" cell, showing the rate at which the currency was converted, or
- An "Exchange Rate" cell, showing the rate applied to the employee's salary components, alongside a separate cell for the applicable FX (foreign exchange) fee.


Hiring Independent Contractors
See All Articles
5 mins
Supported Currency for Contractor Payments
You can pay in any currency via Payoneer, but contractors will always receive funds in USD regardless of what you choose.
Payoneer Contractor Payment Currency
Payoneer allows you to make contractor invoice payments in any currency. However, please note that contractors will only receive the funds in USD, regardless of the currency used during the payment process.
5 mins
How to Stop Monthly Contractor Fee Invoices on Playroll
Stop monthly contractor fee invoices by formally terminating the contractor in Playroll under the Contracts tab.
Playroll generates a monthly fee invoice for independent contractors as long as their status remains Active on the platform. This applies even if the contractor has not submitted an invoice for work completed.
To stop receiving these charges, you must formally terminate the contractor in the Playroll platform. Once the termination is completed, no further monthly fee invoices will be issued for that contractor.
Terminate an Active Contractor
✅ Step 1 – Open the Contracts Tab
Select the dropdown arrow next to the Contractor tab in the navigation panel, then click on Contracts.

✅ Step 2 – Go to the Active Tab
Navigate to the Active tab to view all currently active contractors.

✅ Step 3 – Select the Termination Option
Locate the relevant contractor and select the “X” icon on the right-hand side of their name to initiate termination.

What Happens After Termination?
Once the contractor is marked as terminated, their status changes from Active, and Playroll will stop generating monthly fee invoices associated with that contractor.
This process ensures you only receive invoices for contractors who are actively engaged on the platform.
5 mins
How to Approve and Pay Contractor Invoices
Approve and pay contractor invoices directly on the Playroll platform in just a few steps: access invoices, review, and confirm payment.
Contractor Invoice Payment Guide
✅ Step 1: Access the Contractor Invoices Section
Navigate to the Contractors tab and select Invoices to view pending invoices.
✅ Step 2: Review New Invoices
Invoices pending approval appear under New Invoices. You can view the invoice description (highlighted in purple) and the uploaded document (highlighted in green). Approve by selecting the check mark, or decline using the cross ("x").
✅ Step 3: Select the Contractor for Payment Review
Select the checkbox next to the contractor’s name and click the Review Payment button.
✅ Step 4: Review and Proceed to Payment
On the payment review screen, check the invoice total based on your selected billing currency. If correct, click Pay Now. Note: the option to cover transaction fees is enabled by default.
✅ Step 5: Confirm Payment Details
A confirmation screen will display full payment details, including the locked-in exchange rate valid for 5 minutes. If all information is correct, click Confirm Payment.
To expedite payment processing, you may send proof of payment to our finance team at collections@playroll.com.
Legal & Administrative
See All Articles
5 mins
Playroll's Global Work Health and Safety Policy
This policy explains how Playroll protects the health, safety, and wellbeing of remote and on-site employees, wherever they work.
Playroll is committed to providing a safe and healthy work environment for every employee, regardless of location. Because our workforce is mostly remote, this policy sets out a global framework for occupational health and safety (OHS) and explains what Playroll does to support you, and what we expect from you in return. It applies alongside the health and safety laws of the country where you're employed — and those laws always take priority if they ever conflict with this policy.
Who this policy applies to
This policy covers everyone employed directly by Playroll or by one of our Playroll Partners (local entities that employ people on Playroll's instruction), including:
- Remote employees — anyone who works from home or another remote location approved by Playroll or a Playroll Partner.
- On-site employees — anyone who works at a client's office or another location designated by Playroll or a Playroll Partner.
Where a rule applies to only one of these groups, the policy says so directly. Otherwise, "employees" means both.
What Playroll does to keep you safe
As your employer, Playroll commits to:
- Keeping you informed. We communicate health and safety guidelines, including how to report accidents, incidents, or unsafe conditions.
- Providing training where required. Where local law requires it, we provide reasonable health and safety training for your work environment.
- Supporting your mental health. We promote mental wellness, encourage regular breaks, support a right to disconnect where local law requires one, and offer resources such as counselling where these are mandated by local health and safety laws.
What you're responsible for
You're responsible for taking reasonable care of your own health and safety at work. This includes:
- Completing risk assessments. You may be asked to complete risk assessments or other health and safety documentation.
- Keeping your workspace safe. Make sure your workstation, electrical equipment, and technology are free from hazards during working hours. Use ergonomic furniture where possible, minimise clutter, keep electrical equipment in good working order, reduce noise and distractions, and maintain good personal and home hygiene.
- Following safe work practices. Use equipment as instructed, keep your space tidy, use safe lifting techniques, use display screens correctly, and maintain good posture.
- Completing required training. Attend mandatory health and safety training (digital or otherwise) and take part in any health and safety initiatives.
- Reporting hazards and incidents. See "How to report a health and safety concern" below.
- Looking after your mental health. Take regular breaks and reach out for support if you need it.
- Following any additional rules. If you provide services to a client, follow any health and safety practices they communicate to you.
Setting up a safe home workspace
If you work remotely, set up your workstation to reduce strain and avoid injury. Playroll recommends:
- Chair: a comfortable chair with proper back support.
- Desk: a height that lets you keep your arms at a 90-degree angle.
- Headset: for meetings, to reduce noise disturbance.
- Monitor: positioned so the top of the screen is at or slightly below eye level.
- Keyboard and mouse: positioned to keep your wrists in a neutral position.
- Lighting and ventilation: good natural or minimal artificial lighting, with sufficient air flow.
If your remote workspace doesn't meet these standards, let Playroll know.
If Playroll needs to check your workspace
In exceptional circumstances, Playroll or a Playroll Partner may need access to your remote workspace to assess or resolve a health and safety concern, so we can meet our obligations under local health and safety laws.
Working on-site at a client's office
If you work on-site, familiarise yourself with the health and safety practices at that location. Playroll and our Partners take reasonable steps to make sure any site you work at complies with local health and safety laws, and you may be required to complete mandatory training provided by the site and/or Playroll.
If you're employed through a Playroll Partner
If a Playroll Partner employs you, familiarise yourself with any health and safety policies and practices communicated by that Partner or the client you support.
How to report a health and safety concern
Report any health and safety concerns, accidents, or incidents as soon as possible. Email support@playroll.com or legal@playroll.com.
Playroll or our Partner will investigate reports of unsafe conditions, take corrective action where needed (including reporting to authorities if required), and keep you informed of the outcome and any actions taken.
Returning to work after an illness or injury
If you've been absent due to a work-related or non-work-related injury or illness, you may need medical clearance before returning, where required by law or by Playroll or your Playroll Partner. Depending on your situation, Playroll may ask you to:
- Provide medical certification that you're fit to return to work.
- Take part in a gradual return-to-work arrangement.
- Complete a period of modified duties.
- Complete refresher health and safety training.
Managing fatigue and protecting your work-life balance
If you work remotely, you're responsible for managing your own working hours (in line with your employment agreement) and avoiding fatigue. Playroll encourages you to:
- Take regular breaks throughout the day.
- Keep clear boundaries between work and personal time.
- Take your scheduled time off and annual leave.
- Raise concerns about workload or working hours with your manager.
Where local law gives you a right to disconnect or sets limits on working hours, Playroll complies with those requirements.
Workplace violence and harassment
Playroll and our Partners have zero tolerance for workplace violence and harassment, including in remote workplaces. If you experience or witness this, report it using the contact details above. We'll investigate and take action where required.
Smoking, alcohol, and substance use
Playroll maintains a smoke-free and drug-free workplace. Using or possessing illegal drugs, or being under the influence of drugs or alcohol while working, is strictly prohibited and may lead to disciplinary action. Smoking isn't permitted in shared work environments or on workplace sites.
Emergency preparedness
If you work remotely, have an emergency plan in place at your home or remote location, including access to emergency contacts and a way to evacuate if needed.
If you work on-site, familiarise yourself with, and follow, the emergency and evacuation procedures communicated by Playroll, your Playroll Partner, or the site.
How Playroll handles health and safety records
Playroll and our Partners keep confidential records of health and safety matters, which may include accident and incident reports, investigation findings, training records, medical or health monitoring information (where applicable), and hazard assessments. We retain these records for as long as local health and safety laws require — typically between 3 and 7 years, depending on the country.
How local laws apply
Playroll and our Partners aim to comply with all applicable health and safety laws wherever we employ people. If this policy ever conflicts with local law, local law takes priority.
Because requirements vary by country, you may also be subject to territory-specific rules, such as:
- Risk assessments and hazard management systems.
- Training specific to your location, industry, or role.
- Occupational health services or medical surveillance.
- Health and safety committees.
- Incident and injury reporting to local authorities within set timeframes.
- Extra protections for vulnerable groups, such as pregnant employees or employees with disabilities.
- Specific record-keeping and retention rules.
- Regular compliance audits, inspections, or certifications.
What happens if you don't follow this policy
Not following this policy — including failing to report hazards, attend mandatory training, or follow safe work practices — may lead to disciplinary action, up to and including termination of employment. The action taken depends on the severity of the situation and applicable employment law.
Policy updates
Playroll may update this policy at any time without prior notice. We'll always make the latest version available to you.
Need more help?
Health and safety is a top priority for Playroll, and we're committed to your wellbeing wherever you work. If you have questions about this policy, contact legal@playroll.com.
5 mins
How to Cancel an Expense Claim
Cancel an expense claim before it’s approved by navigating to “My Expenses” and clicking the ❌ button next to the entry.
How to Cancel an Expense Claim Before Approval
✅ Step 1: Navigate to the Expense Management Page
Select the "Expenses" dropdown from the navigation panel and choose the "My Expenses" sub-category under the Expenses menu.
✅ Step 2: Cancel the Relevant Expense
Locate the expense claim you wish to cancel. On the right end of the entry, click the "X" button to remove it.
Once cancelled, the expense claim will be removed from your list and will not be processed for approval or reimbursement.
5 mins
How to View and Download Your Company's Signed MSA
Company administrators can view and download their signed Master Services Agreement (MSA) from Company Settings.
Your Master Services Agreement (MSA) is the signed contract between your company and Playroll. Admins can view it at any time and download a copy for their records directly from the platform.
Before you begin
- Only company administrators can view or download the MSA. Employees and contractors cannot access their company's MSA.
- You must be logged in to your company's admin account.
Complete the task
✅ Step 1 – Open the Settings tab
Select the "Settings" tab on the left-hand side of the screen.
✅ Step 2 – Open Company Settings
Your page opens to an overview of "Profile and Company Settings". Locate the "View MSA" button on the right-hand side of the screen.

✅ Step 3 – View or download the MSA
Click "View MSA" to open the signed document. From here, you can view the agreement and download a copy for your records if you wish.
Terminations
See All Articles
5 mins
How to Track an Employee Offboarding Request in Playroll
Track the status of an employee's resignation, termination, or fixed-term ending request in Playroll from the Offboarding tab.
This applies to company administrators who have already submitted an offboarding request and want to check its progress, review supporting documents, or add further information. Once a request is submitted, Playroll reviews it as part of the compliant offboarding process.
Before you begin
- Confirm that an offboarding request has already been submitted for the employee.
- Confirm that you are authorised to view the employee's contract and offboarding records.
Track the request
✅ Step 1 – Open the Offboarding tab
Go to Contracts and open the Offboarding tab. The employee moves out of the Active tab once their offboarding request is submitted.
✅ Step 2 – Locate the employee's offboarding record
Find the employee's row in the Offboarding tab. It shows the offboarding type, reason, initiator, and proposed termination date.
✅ Step 3 – Open the offboarding details
Select the three dots on the employee's row to open the Actions menu, then select Offboarding details.
✅ Step 4 – Review the request details
Review the request details, attachments, and timeline to see the current status of the offboarding process.
✅ Step 5 – Update the request where needed
Upload further supporting documents or update the request where the platform allows.
What happens next
Playroll reviews the offboarding request and its supporting documents as part of the compliant offboarding process. Check back on this tab for updates, or add supporting documents at any time while the request is open.
5 mins
When is a termination fee applicable?
A termination fee applies if an employee’s contract ends within the first 6 (six) months of engagement. This includes both voluntary resignations and employer-initiated terminations.
Early termination fee
If an employment relationship ends within the first 6 (six) months, a fee equivalent to 3 (three) month’s Playroll fee will be charged to the client.
Why does Playroll charge an early termination fee?
As Playroll does not charge an onboarding or offboarding fee we are required to ensure our basic costs for providing the service are covered.
5 mins
Understanding the Termination Process
All employee terminations must comply with local labor laws and the terms outlined in the employee’s contract. As Playroll is the legal employer, it is responsible for conducting all formal termination actions.
Immediate Notification Required
Notify Playroll as soon as a termination is being considered. Early communication ensures that all required legal procedures can be followed and that the termination is handled appropriately and in a timely manner.
Legal Guidance for Termination
Because each termination is unique and governed by country-specific labor laws, we strongly recommend contacting our legal team for support. They will provide guidance tailored to the specific case and jurisdiction.
For legal support, email legal@playroll.com.
Why Legal Review is Essential
- Ensures compliance with local labor laws and regulations
- Prevents unlawful termination claims
- Clarifies required notice periods, severance, and documentation
- Secures a legally binding and employer-backed termination process
Deposits
See All Articles
5 mins
Deposit Refunds Explained
In accordance with your Master Services Agreement (MSA), any unused portion of the deposit will be refunded after all related matters and claims concerning the employee have been fully resolved, or within two (2) months of the employee’s last working day—whichever occurs later.
Conditions for Refund
The refund is issued only after the following conditions are met:
- All outstanding claims, payments, or obligations relating to the employee are settled
- The employee has officially exited employment
- Two months have passed since the employee’s last working day, if no claims are pending
How is the Deposit Refunded
Should you still have active employees with us we will simply apply your refund as a credit towards your next available invoice. If you no longer have any active employees with Playroll, simply send us the bank details you wish for the deposit to be refunded to.
How to Track and Initiate Refund
To inquire about or initiate your deposit refund which has been outstanding for longer than 2 months, contact our Support team. They will confirm eligibility and guide you through the next steps.
5 mins
Why a Deposit is Required Prior to Signature of an Employment Agreement?
A deposit must be paid before the employment agreement can be issued for signature.
This requirement exists because once an employment agreement is signed, it creates a legal obligation for the employer to compensate the employee for any services rendered. Additionally, terminating a signed agreement is subject to local labor laws and mandatory notice periods, which must be followed to remain compliant.
5 mins
Why do deposits need to be paid?
Deposits are required to ensure Playroll can meet its legal obligation to pay the employee once an employment agreement is signed. This financial safeguard guarantees continuity of salary payments, even if invoice payments are delayed or disrupted for an unforeseen reason.
What is the Purpose of the Deposit?
As soon as an employee signs their contract, the agreement becomes legally binding and Playroll assumes full responsibility for paying the employee. The deposit functions as a financial buffer to:
- Ensure uninterrupted salary payments to the employee
- Protect against delayed or failed invoice payments
- Maintain compliance with local labor laws and payroll schedules
Is the Deposit Refundable?
Yes. The deposit is fully refundable once the employment relationship ends and all outstanding obligations are settled.
When is the Deposit Collected?
The deposit is collected during the onboarding process, prior to the employee’s start date and employment agreement signature, to activate employment services and ensure payroll coverage from day one.
Payroll Management
See All Articles
5 mins
Salary Advance Policy
Overview
Playroll does not offer salary advances to employees under any circumstances. Our payroll structure is standardized and aligned with monthly payroll cycles, ensuring consistency and compliance across all jurisdictions.
Requesting an Advance
If you require a salary advance for urgent reasons, please reach out directly to your client or manager. They can contact Playroll on your behalf to explore any possible solutions or exceptions based on their discretion.
5 mins
Payment of Employee Expenses
If an employee’s expenses are both logged and approved before the payroll cut-off date, the approved expenses will be included in that month’s salary payment.
If the expenses are only approved after the cut-off date then they will be paid out in the following months payroll cycle.
5 mins
How to Estimate an Employee’s Net Salary
Playroll’s Cost Calculator makes it easy to estimate the net salary an employee will receive after taxes and deductions.
By entering key details such as country, salary amount, and currency, you can quickly generate a detailed breakdown showing gross and net pay — helping you plan hiring costs with confidence.
Step-by-Step: Generating a Net Salary Estimate
✅ Step 1: Log in and Open the Tools Section
Log into the Playroll platform and select Tools from the left-hand panel.
✅ Step 2: Select the Hiring Country
Use the dropdown menu to select the country where you plan to hire.
✅ Step 3: Choose the Calculation Method
Select whether to base the calculation on Gross Salary or Total Cost to Employer.
✅ Step 4: Choose Monthly or Annual Projection
Toggle between viewing the cost on a monthly or annual basis.
✅ Step 5: Select Your Display Currency
Choose whether you’d like the calculation in local or billing currency, then enter the salary amount.
✅ Step 6: Click "Get Quote"
Once ready, click the Get Quote button to generate the estimate.
- Note: If the salary entered is below the country’s minimum requirement, the quote will not be generated.
✅ Step 7: View the Net Salary
The quote will display a detailed breakdown. Expand the Gross Salary section to view the estimated net salary.
Please note: This is only an estimate. The final net salary may vary based on tax changes and employee-provided information during onboarding. Playroll does not guarantee net salary amounts.
Benefits
See All Articles
5 mins
What Benefits Are Available in Romania?
At Playroll, we provide country-specific benefits for your employees in Romania, at competitive rates meant for larger groups at any scale, to support your growth.
Playroll takes care of all the mandatory requirements.
Mandatory Benefits Include:
- Health Insurance Contributions
- Pension contributions
- Occupational Medical Checks
Explore in-depth hiring guidance for Romania here.
Optional Benefits Add-Ons:
Private Medical Insurance via SafetyWing
- We offer two tiers of coverage: Standard Plan & Premium Plan. Details and pricing available upon request.
Meal Vouchers via EdenRed
Employers can opt into a meal voucher program that provides employees with a daily allowance for meals:
Voucher breakdown:
- 40.18 RON per working day
- €5 monthly admin fee
- €20 one-time setup fee
Reach out to our team via support@playroll.com for more details on your options and benefits available to Romanian employees.
Leave Policy
See All Articles
5 mins
Where to Find Country-Specific Public Holidays
All country-specific public holidays are listed within the respective hiring guides, available on the Playroll website under the Hiring Guides section.
Step-by-Step Guide to Viewing Public Holidays
✅ Step 1: Navigate to the Hiring Guides
To view the public holidays for a specific country, navigate to the guide for the relevant country and open the Leave Policies tab. Public holidays are detailed under a dedicated subheading within this section.

✅ Step 2: Find Public Holidays in the Leave Policies
Each Leave Policies section includes a clearly marked heading dedicated to public holidays for that country.
5 mins
Updating an Employee's Leave Entitlement
To update your employee’s annual leave entitlement on the Playroll platform, follow the detailed steps below:
Steps to Edit Leave Entitlement
Step 1: Open the Employees Menu
Select the "Employees" category from the left-hand navigation panel.
Step 2: Access the Contracts Section
Click on the "Contracts" sub-category to manage employee agreements.
Step 3: Initiate Contract Changes
Find the employee whose leave you want to update and click the "Make Changes" button.
Step 4: Navigate to Compensation & Legalities
Select "Step 2: Compensation & legalities" to proceed to the section where leave days can be edited.
Step 5: Enter the New Leave Entitlement
Update the leave field with the revised number of days for the employee.
Step 6: Submit the Changes
Click "Sign & add employee" at the bottom of the page to finalize the update.
Step 7: Wait for Signature Approval
A notification will be sent to the authorized signatory. The updated leave will only take effect once the addendum is signed and approved.
5 mins
Cancelling an Employee’s Approved Leave
If you’ve already approved an employee’s leave request but need to cancel it, you can reverse the approval directly within the Playroll platform by following the steps below.
Steps to Cancel Leave Approval
Step 1: Access the Employees Menu
Click on the "Employees" dropdown located in the left-hand navigation panel.
Step 2: Open the Leave Section
Select the "Leave" sub-category. A notification icon will display if there are pending or recently approved leave requests.
Step 3: View Leave Management Screen
The Leave Management screen displays all employee leave entries, including leave type, duration, and reason (if provided).
Step 4: Review Leave Request Details
Click the "i" icon to review detailed information about a specific leave request.
Step 5: Cancel the Leave Approval
Click the "blue backwards arrow" icon to undo or cancel the leave approval.
If you encounter any issues while attempting to cancel an employee's leave request, please contact the Playroll support team for assistance.

Can’t Find What You’re Looking For?
Contact our support team - we’re always here to help! Log in to chat instantly or submit a ticket for a prompt response.