.svg)


-
View the Invoice Description (highlighted in purple).
-
Access the uploaded invoice file (highlighted in green).
-
Click the ✓ tick icon to approve.
-
Click the X icon to decline the invoice.
-
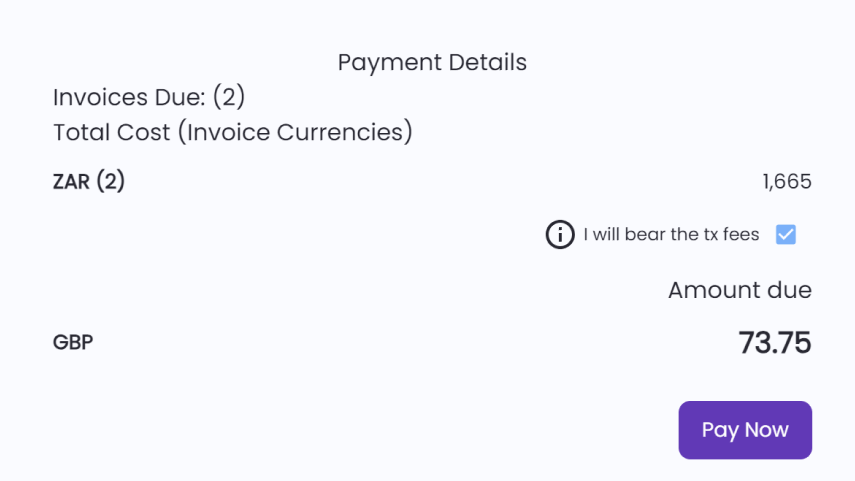
The invoice total
-
The billing currency
-
Whether to cover transaction fees (this is selected by default)
-
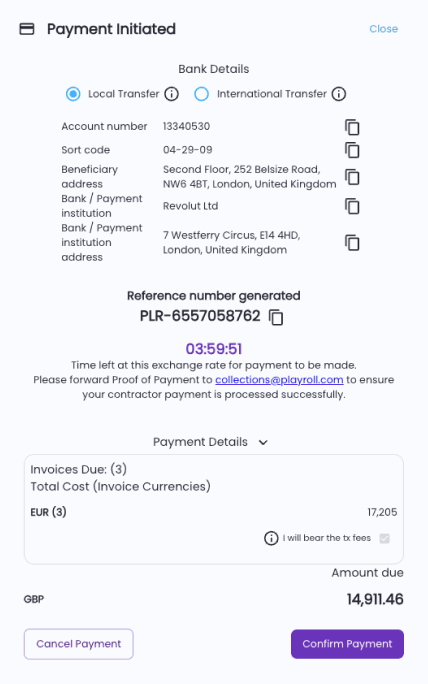
All payment details
-
The locked-in exchange rate (valid for 5 minutes)
- Leave the end date blank for indefinite-term contracts.
- Select the payment frequency (daily, monthly, or hourly) from the "Payment Rate" dropdown.
- If using a custom agreement, enter the relevant details into the required fields.
 5 mins
Supported Currency for Contractor Payments
You can pay in any currency via Payoneer, but contractors will always receive funds in USD regardless of what you choose.
Payoneer Contractor Payment Currency
Payoneer allows you to make contractor invoice payments in any currency. However, please note that contractors will only receive the funds in USD, regardless of the currency used during the payment process.
5 mins
How to Stop Monthly Contractor Fee Invoices on Playroll
Stop monthly contractor fee invoices by formally terminating the contractor in Playroll under the Contracts tab.
Playroll generates a monthly fee invoice for independent contractors as long as their status remains Active on the platform. This applies even if the contractor has not submitted an invoice for work completed.
To stop receiving these charges, you must formally terminate the contractor in the Playroll platform. Once the termination is completed, no further monthly fee invoices will be issued for that contractor.
Terminate an Active Contractor
✅ Step 1 – Open the Contracts Tab
Select the dropdown arrow next to the Contractor tab in the navigation panel, then click on Contracts.

✅ Step 2 – Go to the Active Tab
Navigate to the Active tab to view all currently active contractors.

✅ Step 3 – Select the Termination Option
Locate the relevant contractor and select the “X” icon on the right-hand side of their name to initiate termination.

What Happens After Termination?
Once the contractor is marked as terminated, their status changes from Active, and Playroll will stop generating monthly fee invoices associated with that contractor.
This process ensures you only receive invoices for contractors who are actively engaged on the platform.
5 mins
How to Approve and Pay Contractor Invoices
Approve and pay contractor invoices directly on the Playroll platform in just a few steps: access invoices, review, and confirm payment.
Contractor Invoice Payment Guide
✅ Step 1: Access the Contractor Invoices Section
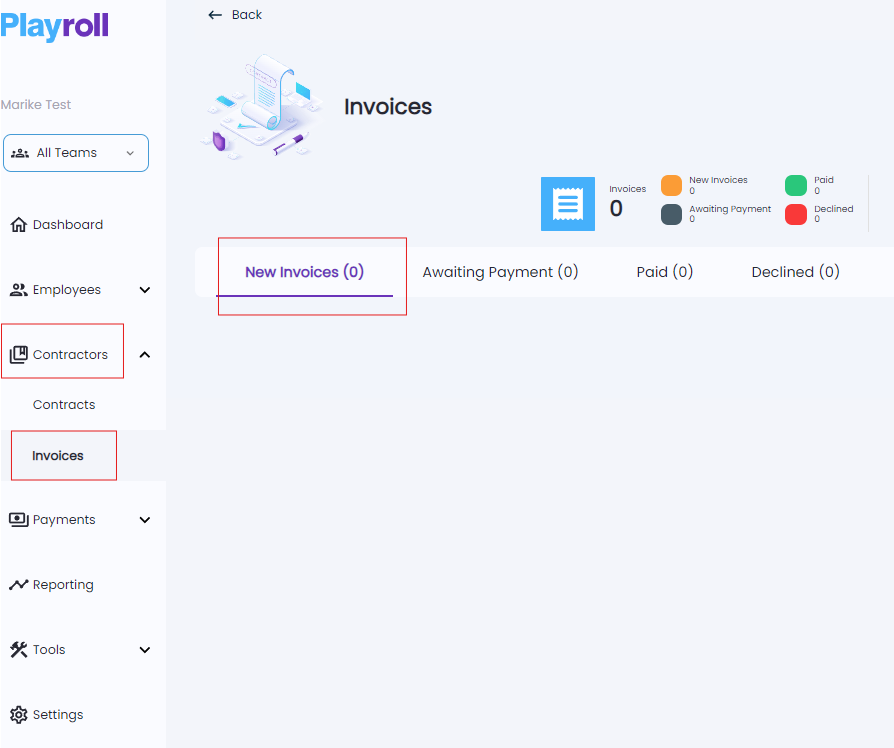
Navigate to the Contractors tab and select Invoices to view pending invoices.
✅ Step 2: Review New Invoices
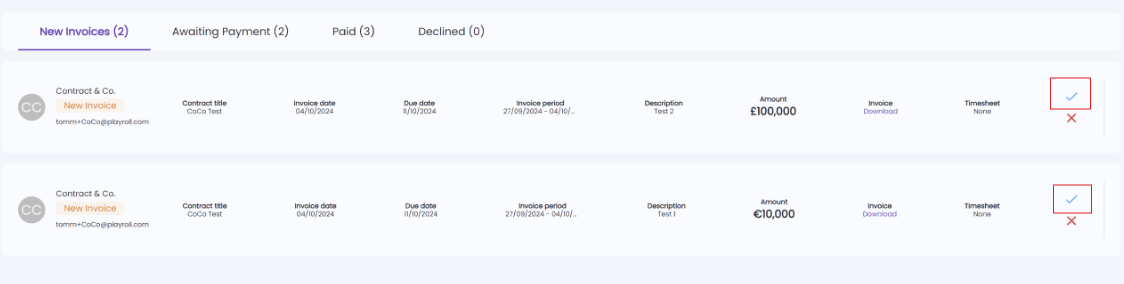
Invoices pending approval appear under New Invoices. You can view the invoice description (highlighted in purple) and the uploaded document (highlighted in green). Approve by selecting the check mark, or decline using the cross ("x").
✅ Step 3: Select the Contractor for Payment Review
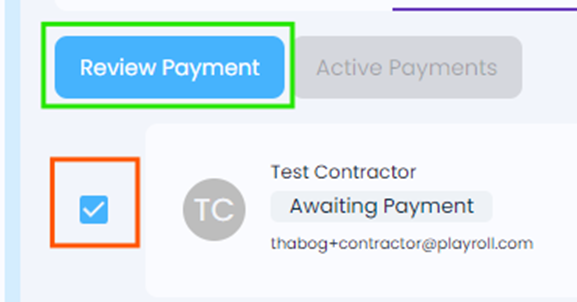
Select the checkbox next to the contractor’s name and click the Review Payment button.
✅ Step 4: Review and Proceed to Payment
On the payment review screen, check the invoice total based on your selected billing currency. If correct, click Pay Now. Note: the option to cover transaction fees is enabled by default.
✅ Step 5: Confirm Payment Details
A confirmation screen will display full payment details, including the locked-in exchange rate valid for 5 minutes. If all information is correct, click Confirm Payment.
To expedite payment processing, you may send proof of payment to our finance team at collections@playroll.com.
5 mins
Add Custom Clauses to an Independent Contractor's Agreement
Add custom clauses to a contractor agreement in Playroll by selecting custom terms during contract setup and entering your own wording.
Adding Custom Clauses to a Contractor Agreement
✅ Step 1: Navigate to Custom Sections and Clauses
During the contract setup process, go to Step 2: Contract Details. Under the “Custom Sections and Clauses” area, select Custom when prompted to choose between standard or custom terms.
✅ Step 2: Add Your Custom Clauses
After selecting the custom option, you will be able to add your own clauses to the agreement using the interface provided.
5 mins
How to Pay Independent Contractor Invoices
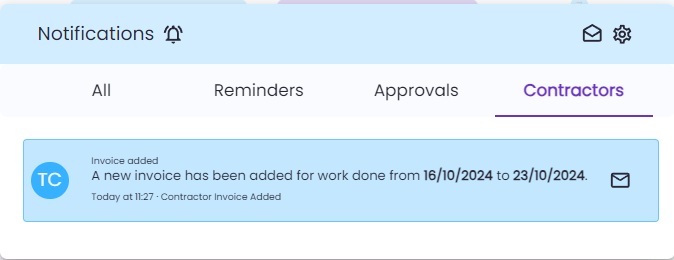
Independent contractor invoices can be reviewed, approved, and paid directly on the Playroll platform. You’ll receive a notification as soon as your contractor uploads an invoice. Follow the steps below to process the payment.
Steps to Pay Contractor Invoices
Step 1: Access the Invoices Tab
Go to the Contractors tab in the Playroll dashboard and select Invoices. You will see a list of all invoices submitted by your independent contractors. As soon as a contractor uploads an invoice, a notification will appear on your portal.
Step 2: Review New Invoices
Invoices awaiting approval will appear under the "New Invoices" section. Here, you can:
To take action:

Step 3: Select Contractor and Review Payment
Select the checkbox next to the contractor’s name whose invoice you wish to pay. Then, click the "Review Payment" button. This action will take you to the payment confirmation screen for the selected invoice.
Step 4: Confirm Payment Details
On the payment review screen, confirm:
If everything is correct, click "Pay Now" to proceed.
Step 5: Finalize the Payment
A summary screen will appear showing:
Review the final details. If everything is accurate, click "Confirm Payment" to finalize the transaction.
5 mins
Adding an Independent Contractor
Easily add a contractor to your organisation using Playroll—complete their details, select an agreement, and send for signature.
How to Add a Contractor in Playroll
✅ Step 1: Select "Add Member"
Click the "Add Member" dropdown at the top right of the screen, then select "Add Contractor" to start.
✅ Step 2: Enter Contractor Information
Complete all required fields on the contractor information screen. Once done, click "Contract details" to continue.
✅ Step 3: Enter Contract Details
Add contract specifics, such as start and end dates and payment terms. Leave the end date blank for indefinite-term contracts.
✅ Step 4: Move to the Legal Step
When all contract details are added, click "Step 3: Legalities and Protection" to continue.
✅ Step 5: Choose an Agreement Template
Select a contract template—either the platform’s Standard Contractor Agreement or "Custom" if needed.
✅ Step 6: Send for Signature
Once the agreement is complete, enter the authorised signatory’s email address. Playroll will automatically send the document to all parties for signature.
