


- Employee import: When you add a new hire in Playroll, you can import their basic details from Personio to pre-fill the Add Employee form.
- Time-off sync: Once you switch on time-off sync, any request approved in Personio is created as approved leave on the Playroll Employee Leave page. The sync runs automatically every 24 hours.
- This is a one-way integration: expenses move from Mesh to Playroll only.
- Expenses sync when they reach Scheduled Payments status in Mesh, not when they're approved, so expect a gap between approval and sync.
- Expenses without a matching category or merchant mapping still sync, but import into Playroll as "Other".
- Receipts, along with local- and billing-currency values, come across with each expense.
- Your dedicated Mesh Customer Success Manager (CSM) has enabled the Playroll partner integration (Partner ID 0006) for your Mesh account.
- You have Company Settings access in Mesh to grant API permissions under Integrations → Mesh API Permissions.
- You have access to Playroll with permission to manage integrations (Tools → Integrations).
- Contact your dedicated Mesh CSM.
- Ask them to enable the Playroll partner integration for your Mesh account.
- Share your company or account details along with the Playroll Partner ID 0006.
- Confirm the required permissions: Employees, Expenses, and Custom Fields.
- Wait for Mesh to confirm that backend enablement is complete before you move on.
- In Mesh, go to Company Settings → Integrations → Mesh API Permissions.
- Find Playroll, listed under Partner ID 0006.
- Select Employees, Expenses, and Custom Fields.
- Save the consent settings.
- On the same Mesh API Permissions page, find the Mesh company ID shown above the partner consent controls.
- Copy the numeric ID.
- Log in to Playroll.
- Go to your Dashboard.
- Select Tools → Integrations.
- Find the Mesh Payments card and select it to open.
- Open the Configuration tab (marker 1).
- Enter your Mesh company ID, digits only (marker 2).
- Select Connect (marker 3).
- Playroll checks the format and confirms it can access that Mesh company.
- In Map expense categories, enter the exact Mesh category or merchant name (marker 1).
- Choose the matching Playroll expense type (marker 2).
- Select Add mapping to map another category or merchant (marker 3).
- Select Update to save your mappings (marker 4).
- A connected integration shows a read-only Mesh company ID and a Disconnect button (marker 5).
- Select Disconnect (marker 5) if you need to stop Playroll from polling for new expenses.
- ✅ Your Mesh CSM has enabled the Playroll partner integration (Partner ID 0006).
- ✅ Employees, Expenses, and Custom Fields consent is granted in Mesh API Permissions.
- ✅ Mesh Payments is successfully connected to Playroll — the Mesh company ID field shows read-only.
- ✅ Expense categories or merchants are mapped to Playroll expense types and saved.
- ✅ Your team understands that expenses sync on Scheduled Payments status, not on approval.
- You have a valid HiBob account with permission to create a Service User
- You are logged into Playroll with permission to manage Integrations
- You have access to HiBob System Settings (Admin-level access)
- Each employee has the same email address in both HiBob and Playroll – the email used to log in to Playroll must match either the work email in "Basic Info" or the "Personal Email" field in their HiBob profile
- Directory, Employees, Lists, About, Address, Basic info, Email, Employment, Equity, Financial, Home, Identification, Jobs, Lifecycle, Payroll, Personal, Personal contact details, Work, Work contact details
- Confidential Docs, Shared Docs
- Settings, Balance, Requests, See who's out today
- Balance: Adjust balances, Bank overtime, See balances
- This is a one-way integration: expenses move from Expensify to Playroll only
- Changes made in either system after syncing won't update the other
- Only approved expenses sync – drafts and pending reports won't appear in Playroll
- You have Workspace Admin or Owner access in Expensify
- You're logged into the Expensify account that owns or administers the workspace
- You have access to Playroll with permission to manage integrations
- You can access Expensify Classic (some required settings live there only)
- Log in to Expensify (new interface)
- Click your account logo in the top corner
- Select Troubleshoot
- Click Switch to Expensify Classic
- In Expensify Classic, go to Settings → Workspaces
- Select the workspace you want to sync with Playroll
- Navigate to Rules
- Enable Public Receipt Visibility
- In the same Rules section, find Receipt Required Amount
- Set the value to 0
- Save your changes
- Public Receipt Visibility is enabled in Expensify
- Receipt Required Amount is set to 0
- Your Expensify workspace permissions are confirmed (Admin or Owner)
- Expensify is successfully connected to Playroll (status shows Active)
- Expense categories are mapped and saved
- Employee emails match between Expensify and Playroll
- Log in to Playroll
- Go to your Dashboard
- Click Tools → Integrations
- Select Expensify
- Open the Configuration tab
- Click Connect (top-right of the page)
- You'll be prompted to enter two credentials:
- Partner User ID
- Partner User Secret
- On the Expensify integration page, go to Expense Categories
- Click Map Categories
- You'll see Expensify categories on the left, Playroll categories on the right
- For each Expensify category, select the corresponding Playroll category:
- Expensify "Car" → Playroll "Car Rental"
- Expensify "Equipment" → Playroll "Equipment."
- Click Save
- Field mapping – customise how expense fields translate between systems
- Time-based sync – control when approved expenses are pulled into Playroll
- Feature-specific toggles – available for some workspace types
 5 mins
How to Integrate Bamboo HR and Playroll
You can integrate Bamboo HR with Playroll by following the steps outlined below.
Step 1:
Select the 'Tools' option from the drop-down navigation panel in Playroll.
Step 2:
Select the ‘integrations’ category as shown below:
Step 3:
Once you are on the integrations page, you will see the available platforms that can be integrated with Playroll. Please select the platform you would like to have integrated with Playroll.
Step 4:
After selecting Bamboo HR, navigate to the 'Configuration' tab at the top of the page.
Step 5:
The Configuration page will provide you with a step-by-step guide on how to connect Bamboo HR with Playroll.
Step 6:
Once the integration has been successful, you will see a green tick to the right of the platform, as can be seen below:
5 mins
How to Integrate Personio and Playroll
The Playroll Personio integration automatically brings employee details and approved time-off from Personio into Playroll, so your HR team doesn’t have to re-enter the same data in both systems.
The integration does two things:
Requirements Before You Start
Before you touch any settings, confirm the following:
• You're a company administrator in Playroll, with access to the Integrations page
• You can sign in to your company's Personio account to complete the connection
• For employee import: the employee profile you want to import hasn't been created in Playroll yet
How to Connect Personio to Playroll
The setup happens in two parts: first, a company administrator connects Personio and sets up time-off sync, then your team imports employees from Personio as they add them in Playroll.
Part 1: Connect Personio and Set Up Time Off Sync
Start on the Integrations page in Playroll, on the Personio section.
Step 1: Open the Personio Integration
This is where you'll connect Personio and manage time off sync.
1. On the Integrations page, select the Personio card (marker 1)
2. Once you're connected, the card shows a Connected badge (marker 2)
Step 2: Review the Overview
The Overview tab shows you how data moves between the two platforms before you connect anything.
1. Open the Overview tab (marker 1)
2. Check the summary: one-way via API, Personio to Playroll, on a scheduled sync every 24 hours (marker 2)
3. Read the description to see how employee import and approved time off sync work (marker 3)
Step 3: Connect Personio
This links your Personio account to Playroll. Until it's done, nothing can sync or be imported.
1. Open the Configuration tab
2. Find “Allow Playroll to access your Personio account?” – it shows Pending Authentication until you're connected (marker 1)
3. Click Connect (marker 2) to open the Knit connection step
4. Sign in to Personio
Watch out for this: the status stays Pending Authentication until the connection is complete. Don't move on to time off sync until it shows Active.
Step 4: Check the Connection and Turn On Time-Off Sync
Approved time-off only syncs once the toggle is switched on.
1. Check that the status pill shows Active (marker 1) and the button has changed to Reconnect
2. In Time off Requests, turn on the toggle (marker 2)
3. Click Map now, or Edit mapping if you've mapped types before (marker 3)
4. Once your mapping is saved, click Save (marker 4)
Step 5: Map Personio Time-Off Types
This tells Playroll which Playroll leave type each Personio time off type should become.
1. In the Time Off Types Mapper, find each Personio time off type listed under External Fields (marker 1)
2. Choose the matching Playroll leave type under Playroll Fields (marker 2)
3. Click Save mapping (marker 3)
Watch out for this: a Personio type left unmapped, like “Home office” in the screenshot, is skipped. Those requests won't appear in Playroll.
Step 6: Check Approved Leave in Playroll
Leave doesn't appear in Playroll the moment it's approved in Personio.
1. Approved Personio time-off requests for matched employees are created as approved leave
2. Find them on the Employee Leave page after the next scheduled sync
Watch out for this: the sync runs every 24 hours, so expect up to a day's gap between approval in Personio and the leave showing in Playroll.
Part 2: Import an Employee From Personio
Start on the Add employee form. The import option only shows when Personio is connected and the employee hasn't been created yet.
Step 7: Start the Import
Importing pre-fills the form with the employee's Personio details, so you don't type them again.
1. Open the Add employee form
2. Click Import from Personio (marker 1)
Watch out for this: if you can't see Import from Personio, check that Personio is connected and that the employee hasn't already been created in Playroll.
Step 8: Choose the Employee and Import
This brings the employee's available Personio details into the Add employee form.
1. In Personio Employee Import, select the employee from the Personio Employee list (marker 1)
2. Click Begin import (marker 2)
3. Check the pre-filled info, complete the remaining fields and submit the form as usual
Watch out for this: the form is only pre-filled with the info available in Personio, so some fields may still be empty. Complete them before you submit.
Setup Checklist
Before considering the integration complete, confirm all of the following:
✅ Personio is connected – the status pill shows Active and the Personio card shows Connected
✅ The Time off Requests toggle is switched on
✅ Every Personio time off type you use is mapped to a Playroll leave type and saved
✅ Your team knows approved time off appears after the next scheduled sync, every 24 hours
✅ Your team knows to use Import from Personio on the Add employee form for new hires
Personio + Playroll FAQs
Why isn't approved Personio time-off showing up in Playroll yet?
The most common reason is timing: approved requests come across on a scheduled sync every 24 hours, not the moment they're approved. If it still hasn't appeared after the next sync, check that the Time off Requests toggle is on, the time off type is mapped, and the employee is matched in Playroll.
Why are some Personio time-off requests missing from Playroll?
Their time off type probably isn't mapped. A Personio type left unmapped, like “Home office”, is skipped. Open the Configuration tab, select Edit mapping, choose a Playroll leave type for it, then click Save mapping and Save.
Can Playroll send changes back to Personio?
No. This is a one-way integration; data moves from Personio to Playroll only. Changes you make in Playroll won't update Personio.
Why can't I see Import from Personio on the Add employee form?
The button only shows when Personio is connected and the employee hasn't been created in Playroll yet. Check that the status on the Personio Configuration tab shows Active.
5 mins
How to Integrate Mesh With Playroll
What the Mesh and Playroll Integration Does
Connecting Mesh to Playroll moves approved out-of-pocket expenses from Mesh into Playroll automatically, without manual exports or reconciliation. Connect Mesh to Playroll in two stages, so expenses sync automatically once they reach Scheduled Payments status in Mesh.
Once your Mesh company is connected, Playroll picks up each approved expense when it reaches Scheduled Payments status, matches it to the right expense type, and makes it available for processing. Your team keeps submitting and approving expenses in Mesh exactly as they do today.
💡 How the sync works: Playroll only pulls in expenses once Mesh moves them to Scheduled Payments. An expense that's approved but still earlier in the Mesh workflow won't appear in Playroll yet — that's expected, not a fault.
If an expense seems to be missing, check its status in Mesh before assuming the integration is broken.
Requirements Before You Start
Before you change any settings, confirm the following:
⚠️ Important: If Mesh hasn't enabled the Playroll partner integration and granted consent for Employees, Expenses, and Custom Fields, the connection in Playroll will fail. Confirm enablement with your Mesh CSM before you start.
How to Connect Mesh to Playroll
Set up the integration in two stages: first, your company authorizes Playroll inside Mesh; then a Playroll admin connects the account and maps expense categories in Playroll.
Part 1: Authorize Playroll in Mesh
Complete these steps in Mesh before you open Playroll. You'll need your dedicated Mesh CSM for the first step.
✅ Step 1 – Request Playroll Enablement From Mesh
Mesh has to switch on the Playroll partner integration on their side before your company can connect anything. Skip this step and the connection in Playroll will fail.
🧩 Watch out for this: Enablement can take a few business days, depending on your CSM's turnaround. Start this step early if you're working toward a go-live date.
✅ Step 2 – Grant API Consent in Mesh
Playroll can only read expense data that Mesh has explicit permission to share. Miss even one permission here, and the sync can quietly fail later, even though everything else looks set up correctly.
🧩 Watch out for this: A missing permission doesn't always produce an obvious error — it can simply mean the connection or the sync doesn't work. Confirm that all three permissions are selected before you save.
✅ Step 3 – Copy Your Mesh Company ID
Playroll uses this ID to confirm you're connecting the right Mesh company. You'll need it in Part 2.
🧩 Watch out for this: Treat this ID as a sensitive company identifier. Redact it from any screenshots or tickets you share outside your organization.
Part 2: Connect and Configure Mesh in Playroll
Once Mesh confirms enablement and consent is granted, finish the setup in the Playroll employer dashboard.
✅ Step 4 – Open the Mesh Payments Integration
This is where you connect your Mesh company and set up expense mapping.
✅ Step 5 – Connect Your Mesh Company
This step links your Mesh company to Playroll. Until it's done, no expense data can sync.
🧩 Watch out for this: If the connection fails, your company stays disconnected and nothing changes — Playroll doesn't retry automatically. Check that the ID contains digits only and try again. Once the connection succeeds, the ID field becomes read-only and the mapping panel appears below it.
✅ Step 6 – Map Expense Categories
This tells Playroll which Playroll expense type each Mesh category or merchant should become. Without a mapping, an expense still syncs, but it lands as "Other".
🧩 Watch out for this: Merchant matching takes priority over category matching, and the Mesh spelling and letter case must match exactly — for example, "travel" and "Travel" aren't treated as the same thing. Avoid duplicate mapping keys. Mapping changes apply only to expenses imported after you save them.
✅ Step 7 – Confirm the Connection or Disconnect
Once connected, you can check the integration's status at a glance and disconnect it (marker 5) if you need to pause syncing.
🧩 Watch out for this: Disconnecting in Playroll stops future syncing, but it doesn't delete expenses already imported, and your saved mappings stay in place for next time. It also doesn't revoke the consent you granted in Mesh. To remove API access entirely, revoke Playroll's consent under Mesh API Permissions or contact your Mesh CSM. If consent is revoked on the Mesh side, disconnect the integration in Playroll too, so you don't end up with repeated connection errors.
Setup Checklist
Before you consider the integration complete, confirm all of the following:
Mesh and Playroll FAQs
Why aren't my Mesh expenses showing up in Playroll yet?
The most common reason is timing: expenses sync only once they reach Scheduled Payments status in Mesh, not the moment they're approved. Check the expense's status in Mesh first. If it's already at Scheduled Payments and still hasn't appeared, confirm that Mesh Payments shows as connected in Playroll and that your Mesh API consent is still active.
Can Playroll send expense changes back to Mesh?
No. This is a one-way integration — expenses move from Mesh to Playroll only. Any changes you make in Playroll after an expense syncs won't update the record in Mesh.
What happens to expenses I haven't mapped to a category?
They still sync; they import into Playroll as "Other" instead of a specific expense type. You can add the missing mapping at any time, but it applies only to future imports, not to expenses that already came through as "Other".
Does disconnecting in Playroll remove Playroll's access to Mesh?
No. Disconnecting in Playroll only stops Playroll from polling for new expenses — it doesn't revoke the API consent you granted in Mesh. To remove access entirely, revoke Playroll's consent under Mesh API Permissions or contact your Mesh CSM.
5 mins
How To Integrate HiBob With Playroll
What the HiBob + Playroll Integration Does
HiBob integrates natively with Playroll, automatically syncing employee records, time-off requests, and payslips between the two platforms. Your HR team manages people in Bob, while Playroll handles global employment, compliance, and payroll behind the scenes. Together, the integration eliminates duplicate data entry, keeps leave records accurate across both systems, and ensures employees always have access to their payslips in one place.
Requirements Before You Start
Before you get started, confirm the following:
💡 Important: If you don't have the right access level in HiBob to create a Service User, contact your HiBob administrator before proceeding.
How to Connect HiBob To Playroll
The setup happens in two parts: first, you create and configure a Service User in HiBob, then you connect it to Playroll and configure your sync settings.
Part 1: Set Up a Service User in HiBob
A HiBob Service User is a dedicated API credential that allows Playroll to securely read and write data to your HiBob account.
Step 1: Create a Service User in HiBob
Follow HiBob's official guide on creating a Service User and retrieving your credentials: 👉 HiBob API Service Users Guide
Once created, take note of your Service User ID and Token (you'll need these in Part 2).
Step 2: Set the Correct Permissions – Features Tab
In HiBob, navigate to System Settings → Permission Groups and open the permission group assigned to your Service User.
Under the Features tab, ensure the following are enabled:
People
Docs
Time off
Step 3: Set the Correct Permissions – People's Data Tab
Still in the same Permission Group, click the People's Data tab.
Under Access data for, ensure the Service User has access to Everyone (or the relevant employee subset if you are limiting scope).
💡 Tip: If you only want Playroll to sync a subset of employees, select "Select people by condition" or "Select people by name" instead of Everyone, and define the relevant filter.
Under the Time off section of People's Data, confirm all of the following sub-permissions are checked:
Requests: Create, edit, cancel, approve, and view all time-off request fields
Part 2: Connect HiBob to Playroll
Step 4: Navigate to Integrations in Playroll
Log in to app.playroll.com. From your dashboard, click Tools in the left sidebar, then click Integrations.
Step 5: Select HiBob
On the Integrations page, locate and click the HiBob tile.
Step 6: Open the Configuration Tab and Click Connect
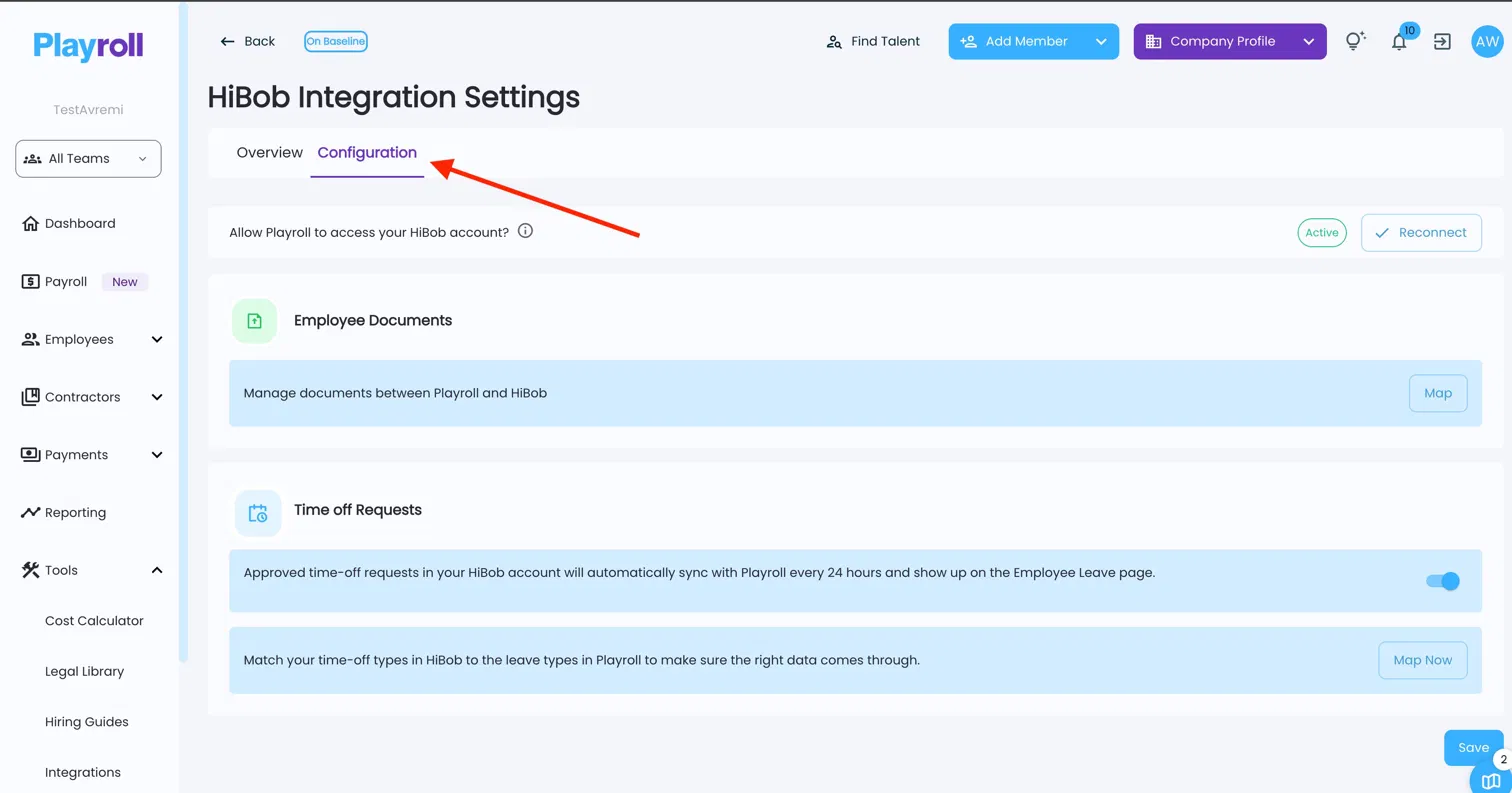
On the HiBob Integration Settings page, click the Configuration tab. You'll see the status showing Pending Authentication with a Connect button in the top-right corner. Click Connect.
Step 7: Enter Your HiBob Service User ID and Token
A modal will appear prompting you to enter your HiBob Service User ID and Service User Token. Copy and paste these from HiBob, then submit.
Part 3: Configure Sync Settings
Step 8: Enable Time-Off Sync
Once connected, under Time off Requests on the Configuration tab, toggle on the time-off sync.
💡Good to know: Approved time-off requests in HiBob will automatically sync with Playroll every 24 hours and appear on the Employee Leave page.
Step 9: Map HiBob Time-Off Types to Playroll Leave Types
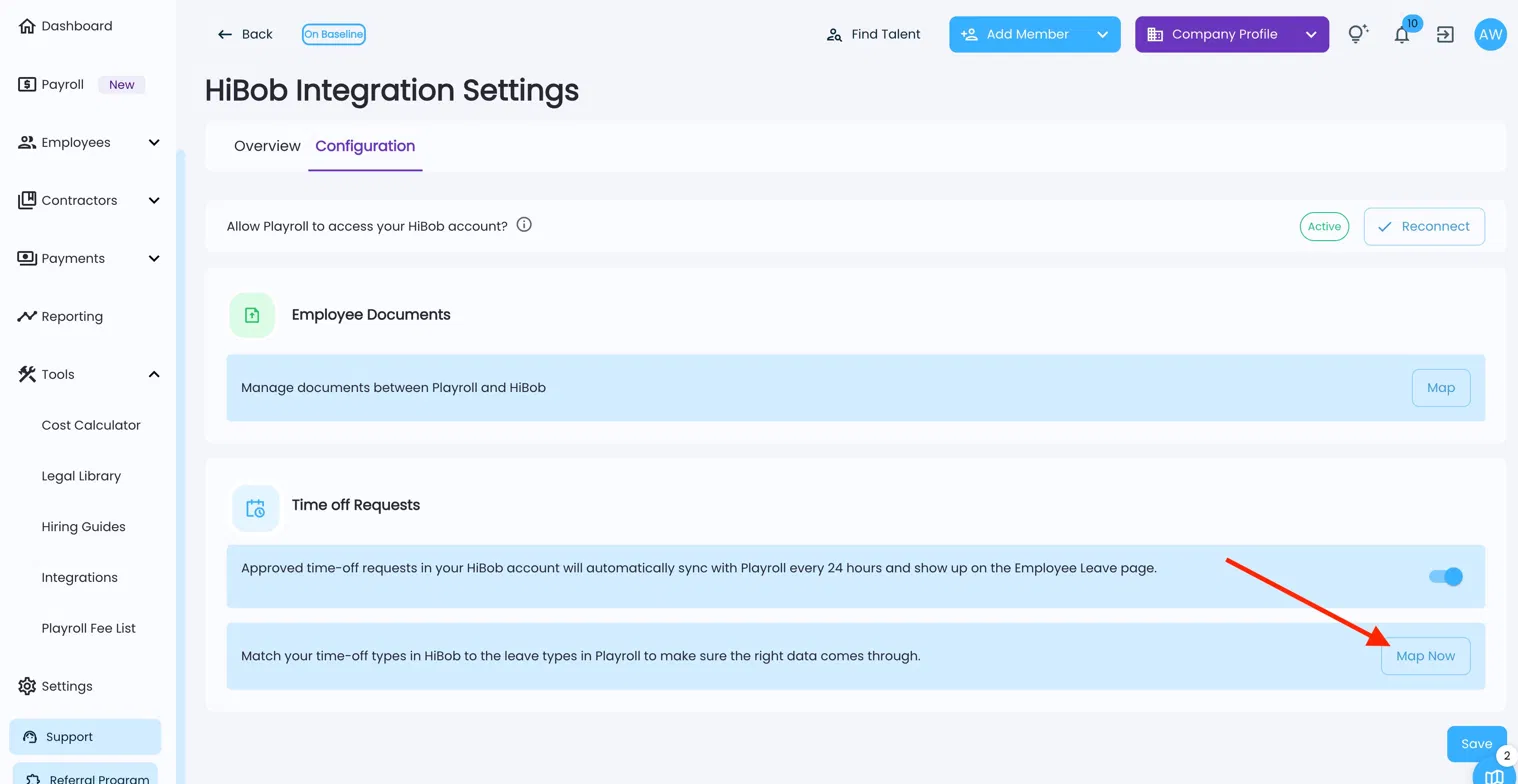
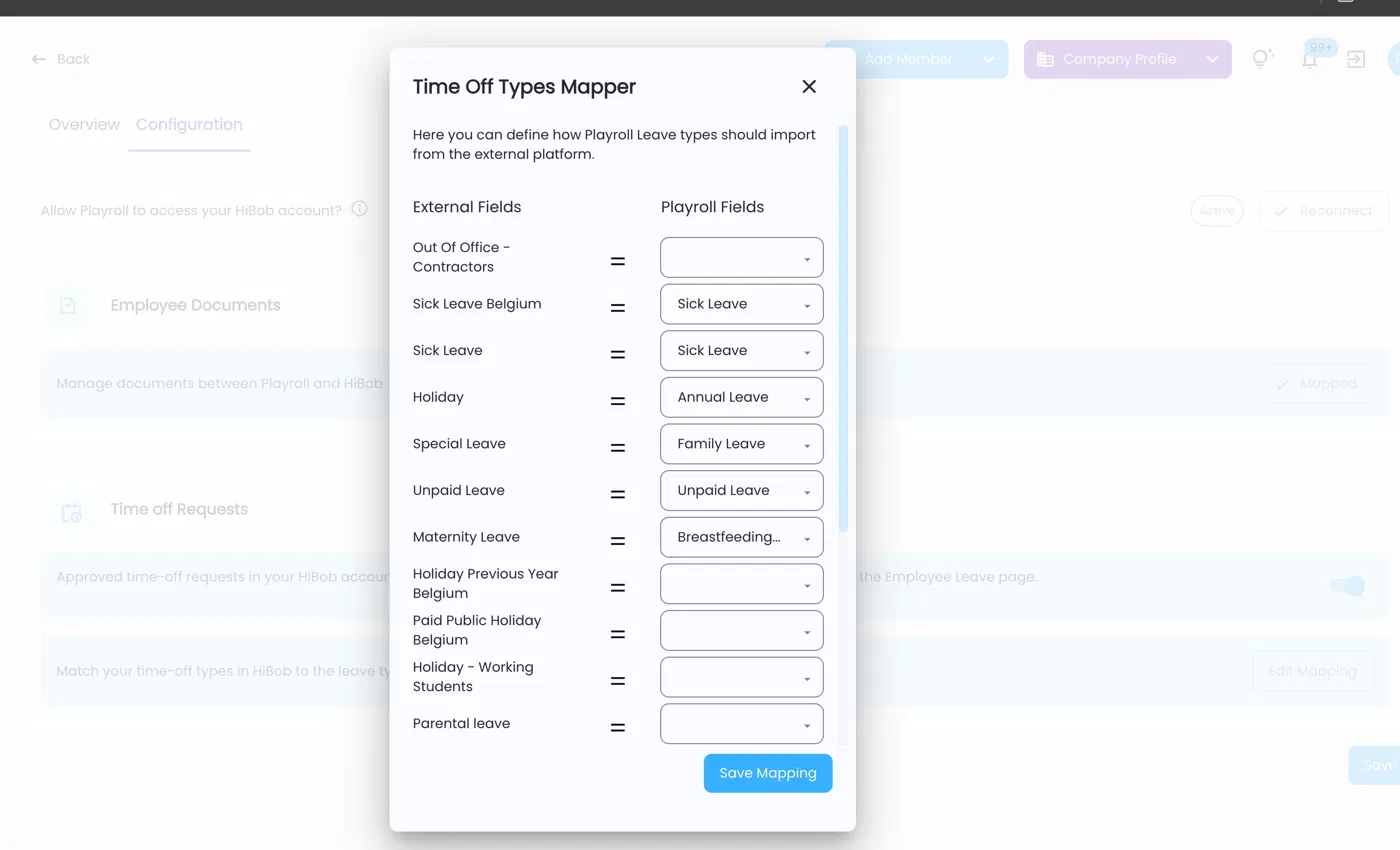
Click Map Now next to the time-off mapping row. In the Time Off Types Mapper, match each HiBob leave type on the left to the corresponding Playroll leave type on the right. Click Save Mapping when done.
💡Note: Leave types that are not mapped will not sync. If you add new leave types in HiBob later, return here to update the mapping.
Step 10: Map Payslip Documents to a HiBob Folder
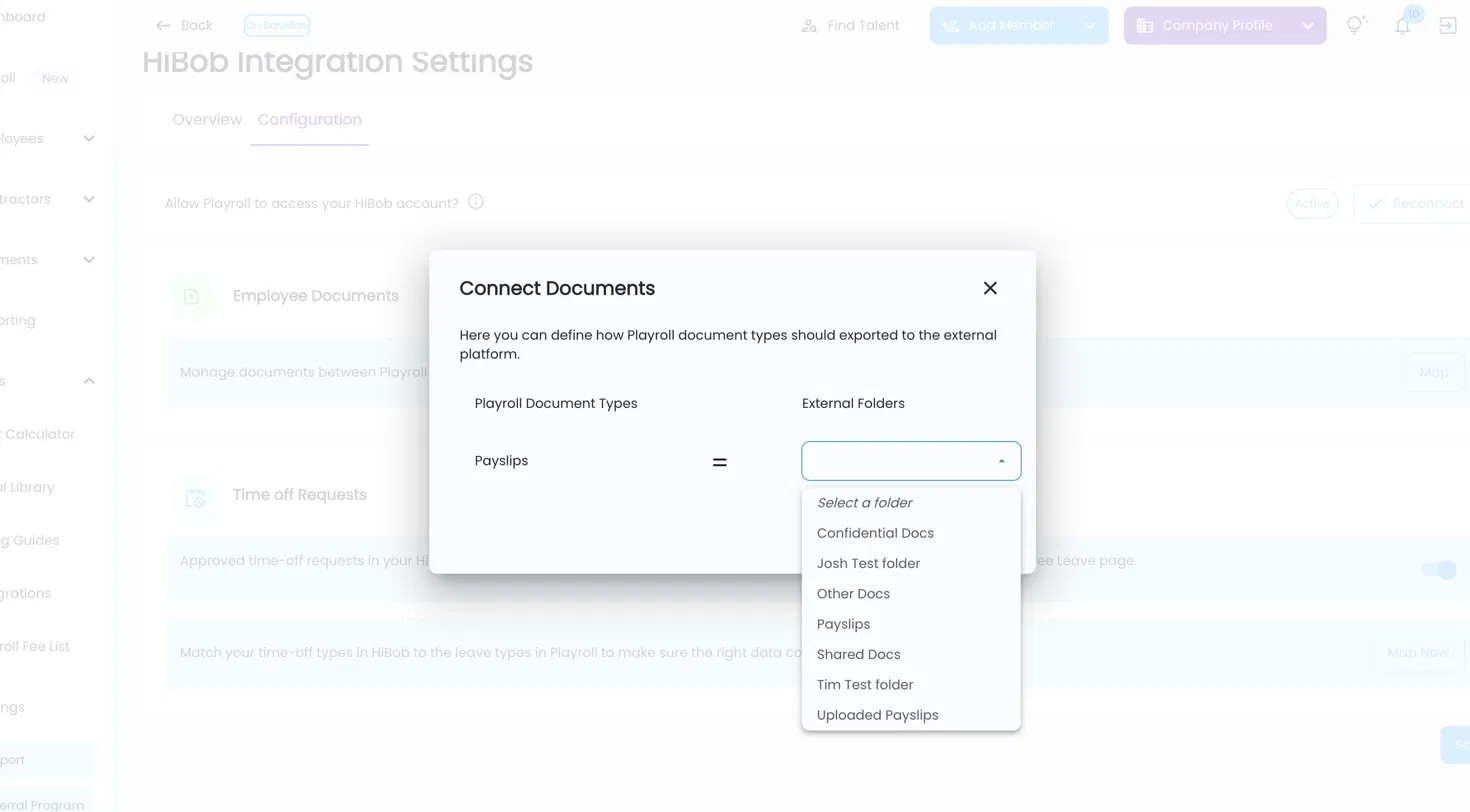
Under Employee Documents, click Map. In the Connect Documents modal, select which HiBob folder your Playroll payslips should sync to (e.g. "Payslips", "Confidential Docs", or a custom folder). Click Save when done.
Click the blue Save button on the Configuration page to confirm all settings.
Part 4: Import Your First Employee
Step 11: Add an Employee via the HiBob Import
From your Playroll dashboard, click Add Member → Add Employee in the top navigation bar.
On the Employee info screen, click the Import from HiBob button at the top of the form.
In the HiBob Employee Import modal, select the employee you want to import from the dropdown, then click Begin Import. Their details will populate automatically.
Setup Checklist
Before considering the integration complete, confirm all of the following:
✅ HiBob Service User created with all required Features and People's Data permissions
✅ Service User ID and Token entered in Playroll and status shows Active
✅ Time-off sync is toggled on
✅ All relevant HiBob leave types are mapped to Playroll leave types
✅ Payslips are mapped to the correct HiBob document folder
✅ Employee email addresses match between HiBob and Playroll
HiBob + Playroll FAQs
Why isn't the "Import from HiBob" button appearing when I add an employee?
The import button only appears once your HiBob Service User credentials have been successfully entered and the integration status shows Active on the Configuration tab. If you've just connected, try refreshing the page. If the status still shows Pending Authentication, double-check that the Service User ID and Token were entered correctly.
How long does it take for leave requests to appear in Playroll after I turn on the sync? Approved time-off requests sync from HiBob to Playroll every 24 hours. If a request was approved in HiBob today, it may take up to 24 hours to appear on the Employee Leave page in Playroll. Requests must be approved in HiBob first, as pending requests will not sync.
What happens if an employee's email doesn't match between HiBob and Playroll?
The sync relies on a matching email address to identify employees across both platforms. If the email used to log in to Playroll doesn't match either the work email or personal email in HiBob, the employee's records won't sync correctly. Ensure email addresses are updated in both systems before running an import or enabling leave sync.
Can I control which employees Playroll has access to in HiBob?
Yes. In HiBob's Permission Group settings for your Service User, you can limit access under the People's Data → Access data for section by selecting "Select people by condition" or "Select people by name" rather than Everyone. This is optional and useful if you only want Playroll to manage a subset of your workforce.
5 mins
How To Integrate Expensify With Playroll
What the Expensify + Playroll Integration Does
Connecting Expensify to Playroll means approved employee expenses flow directly into Playroll for processing – without manual exports, copy-pasting, or reconciliation needed.
Once set up, any expense your team submits and gets approved in Expensify will automatically sync into Playroll, ready to be included in payroll runs.
A few things worth knowing upfront:
Requirements Before You Start
Before you touch any settings, confirm the following:
Important: If you don't have Admin or Owner-level access in Expensify, you won't be able to complete the connection. Check your role under Workspaces → Members before you start.
How To Connect Expensify To Playroll
The setup happens in two parts: first, you configure a few things in Expensify, then you connect to Playroll and map your expense categories.
📹 Prefer a walkthrough? Watch this short Loom video for a full run-through of the setup before you start: Watch the Expensify + Playroll Setup Video
Part 1: Required Configuration in Expensify
These steps need to be completed in Expensify before you go to Playroll. Skipping them is the most common reason the integration doesn't work.
Step 1: Switch to Expensify Classic
Some of the settings you need are only available in the older Expensify interface.
Step 2: Enable Public Receipt Visibility
Playroll needs to be able to read receipts to process expenses. If this setting isn't turned on, expenses won't sync – even if everything else is configured correctly.
Watch out for this: Public Receipt Visibility is off by default on most workspaces. It's easy to miss - and if it's not enabled, no expenses will appear in Playroll, regardless of other settings.
Step 3: Set "Receipt Required Amount" to Zero
This ensures every expense requires a receipt before it can sync.
Why does this matter? If the required amount is set to, say, 100, any expense below that threshold won't need a receipt and won't sync to Playroll.
Step 4: Confirm Your Workspace Permissions
Double-check that the person setting up the integration is either a Workspace Admin or the Workspace Owner. You can verify this under Workspaces → Members.
If you don't have the right access level, contact whoever manages your Expensify account before continuing.
Setup Checklist
Before considering the integration complete, confirm all of the following:
Part 2: Connecting Expensify to Playroll
Once Expensify is configured, move to Playroll to complete the connection.
Step 5: Navigate to the Expensify Integration
Step 6: Connect Your Expensify Account
To find these, click "Find our Partner ID" in the Playroll pop-up while logged in to Expensify. Copy both values and paste them into Playroll, then click Submit.
Once the connection is successful, the integration status will update to Active.
Part 3: Mapping Expense Categories
The final step is making sure Expensify's expense categories match up with Playroll's. Without this mapping, expenses may not be categorized correctly when they arrive in Playroll.
Step 7: Map Expensify Categories to Playroll Categories
Practical Tip: Make sure your employees' email addresses in Expensify match their Personal Emails in Playroll. If they don't match, expenses won't be attributed to the correct employee.
Optional Integration Settings
Depending on your team's setup, you may also want to configure:
If your integration doesn't have advanced config options, you can skip this section.
